- We ship to all 50 States and Canada Order Now 714-234-6899/714-452-7679

Bí quyết nấu cá bống kho tộ thơm ngon đậm vị, đưa cơm khó cưỡng ngay tại nhà

Cá bống kho tộ không chỉ là món ăn dân dã quen thuộc trong mâm cơm người Việt, mà còn là biểu tượng của sự tinh tế trong ẩm thực truyền thống. Với hương thơm quyến rũ, vị đậm đà thấm sâu vào từng thớ cá, món ăn này dễ dàng chạm đến trái tim của bất kỳ ai từng thưởng thức. Trong bài viết dưới đây, hãy cùng Khô bò CALI khám phá cách chế biến cá bống kho tộ chuẩn vị, đơn giản mà vô cùng cuốn hút.

Hướng dẫn chi tiết cách làm món cá bống kho tộ ngon chuẩn vị, đậm đà khó cưỡng

cá bống kho tộ

Để món cá bống kho tộ đạt được độ thơm ngon, đậm đà đúng chuẩn hương vị truyền thống, việc chuẩn bị nguyên liệu là bước không thể xem nhẹ. Dưới đây là danh sách nguyên liệu bạn cần có để chế biến một nồi cá kho hấp dẫn, phù hợp cho khẩu phần khoảng 4 người ăn:

  • 500g cá bống tươi: Nên chọn cá còn sống hoặc mới đánh bắt để đảm bảo độ ngọt thịt và không bị tanh khi kho.

  • 50ml nước dừa tươi: Giúp món kho có vị ngọt thanh tự nhiên và màu sắc hấp dẫn hơn.

  • 10 trái ớt tươi: Tùy vào khẩu vị, bạn có thể điều chỉnh lượng ớt để món ăn có độ cay vừa ý.

  • 4 củ hành tím: Hành tím giúp món ăn thêm dậy mùi và tăng hương vị đặc trưng.

  • 6 nhánh hành lá: Dùng để rắc lên sau khi kho giúp tăng độ thơm và tạo màu sắc đẹp mắt.

  • 1 quả chanh: Dùng để làm sạch và khử mùi tanh của cá trước khi chế biến.

  • 2 – 3 tép tỏi: Tỏi giã dập sẽ làm tăng hương vị và giúp món ăn thơm nồng hơn.

  • 50g tóp mỡ: Đây là nguyên liệu tạo nên vị béo đặc trưng, giúp cá thấm gia vị và ngon hơn khi kho.

  • 3 muỗng canh nước hàng (nước màu): Giúp món cá kho có màu nâu cánh gián hấp dẫn, bắt mắt.

  • 4 muỗng canh nước mắm loại ngon: Thành phần tạo nên hương vị đậm đà đặc trưng của món kho.

  • 1 muỗng canh dầu ăn: Dùng để phi hành tỏi và tạo độ bóng cho cá khi kho.

  • Gia vị khác: Hạt tiêu, muối hạt, đường, có thể thêm một ít bột ngọt nếu cần để cân bằng vị.

Lưu ý: Lượng nguyên liệu trên thích hợp cho bữa ăn gia đình khoảng 4 người. Tùy theo số lượng thành viên, bạn hoàn toàn có thể điều chỉnh nguyên liệu sao cho phù hợp mà vẫn giữ được hương vị đặc trưng của món cá bống kho tộ.

Sơ chế nguyên liệu 

Trước khi bắt tay vào kho, khâu sơ chế nguyên liệu – đặc biệt là cá bống – đóng vai trò quyết định đến chất lượng món ăn. Nếu làm kỹ và đúng cách, cá sẽ không còn mùi tanh, thịt săn chắc mà vẫn giữ được vị ngọt tự nhiên.

cá bống kho tộ

Đối với cá bống:

Ngay khi mua về, bạn nên rửa cá bống dưới vòi nước lạnh để loại bỏ lớp chất nhờn, bụi bẩn bên ngoài. Tiếp theo, dùng muối hạt và nửa quả chanh chà nhẹ lên toàn thân cá trong khoảng 5 phút. Cách này không chỉ giúp khử mùi tanh hiệu quả mà còn làm sạch nhớt, giúp cá săn và thơm hơn khi chế biến. Sau đó, rửa lại cá bằng nước sạch nhiều lần cho thật kỹ và để ráo nước.

Lưu ý: Cá bống có thân nhỏ và thịt mềm, vì vậy trong quá trình sơ chế, bạn nên thao tác nhẹ nhàng để tránh làm cá bị nát, ảnh hưởng đến hình thức món kho.

Khi cá đã ráo, dùng dao sắc cắt cá thành từng khúc dày khoảng 2 – 3 cm sao cho vừa ăn. Cho cá vào tô lớn, thêm một chút muối hạt và trộn đều để cá thấm vị. Ướp cá trong khoảng 20 phút để phần thịt cá đậm đà hơn khi kho.

Đối với các nguyên liệu phụ khác:

  • Hành tím: Bóc vỏ sạch, rửa sơ nếu cần rồi đập dập để khi phi lên dậy mùi thơm.

  • Tỏi: Lột vỏ rồi đập dập và băm nhuyễn. Tỏi băm sẽ tan vào nước kho, giúp tăng độ thơm béo đặc trưng.

  • Ớt tươi: Rửa sạch, để ráo rồi cắt bỏ cuống. Tùy khẩu vị, bạn có thể đập dập để tạo vị cay nồng hoặc để nguyên quả nếu muốn vị cay nhẹ và hương thơm thoảng nhẹ.

  • Hành lá: Nhặt bỏ rễ, rửa sạch, để ráo rồi cắt khúc từ 2 – 3 cm. Có thể chia làm hai phần: phần trắng dùng để phi cùng hành tỏi, phần lá xanh để rắc lên khi món ăn hoàn tất, tạo màu sắc bắt mắt và hương thơm hấp dẫn.

Chế biến món cá bống kho tộ đậm đà thơm lừng 

Khi nguyên liệu đã được sơ chế cẩn thận, chúng ta bắt đầu bước vào công đoạn quan trọng nhất – kho cá. Đây chính là lúc thể hiện sự tinh tế và khéo léo trong từng bước nêm nếm, canh lửa và kết hợp gia vị để tạo nên một món ăn dậy hương, đậm vị, khiến ai nếm thử cũng phải xuýt xoa.

Đầu tiên, đặt nồi đất hoặc nồi gang lên bếp, cho vào khoảng 1 muỗng canh dầu ăn rồi đun nóng. Khi dầu đã sôi nhẹ, cho hành tím băm và tỏi băm vào phi đều tay cho đến khi chuyển sang màu vàng ruộm và dậy mùi thơm hấp dẫn. Mùi thơm của hành tỏi lan tỏa trong căn bếp chính là tín hiệu cho thấy món ăn sắp bắt đầu vào giai đoạn hấp dẫn nhất.

Tiếp theo, cho phần tóp mỡ đã chuẩn bị sẵn vào nồi, đảo nhẹ tay để tóp mỡ thấm đều hương hành tỏi, tạo lớp nền béo thơm đặc trưng cho món kho. Khi tóp mỡ bắt đầu hơi săn lại thì nhẹ nhàng xếp cá bống vào nồi. Lưu ý đặt từng khúc cá sát đáy nồi để cá chín đều và thấm gia vị, đồng thời tránh làm cháy phần hành tỏi phía dưới. Đảo nhẹ tay nếu cần để cá không bị vỡ, giữ nguyên hình dáng đẹp mắt.

cá bống kho tộ

Bắt đầu nêm nếm: thêm vào 4 muỗng canh nước mắm ngon, 1.5 muỗng đường, trộn đều và kho lửa vừa khoảng 5 phút để cá ngấm đều gia vị ban đầu.

Sau đó, tiếp tục cho vào nồi các nguyên liệu khác gồm: 1 muỗng canh muối, 10 quả ớt đập dập, 3 muỗng nước hàng (nước màu)50ml nước dừa tươi. Nước dừa sẽ giúp món cá có vị ngọt dịu, đậm đà tự nhiên hơn. Đậy kín nắp, vặn nhỏ lửa và kho liu riu trong khoảng 30 phút, cho đến khi cá chín mềm, thấm gia vị và nước kho sánh lại. Trong quá trình kho, nếu thấy nước cạn quá nhanh, bạn có thể thêm một ít nước lọc, nhưng chỉ nên cho vừa đủ để tránh làm nhạt hương vị.

Khi thấy nước kho đã cạn sệt lại, cá chuyển sang màu nâu óng hấp dẫn thì nêm nếm lại gia vị lần cuối cho vừa miệng. Cuối cùng, rắc vào một ít tiêu xay, vài lát ớt tươi và hành lá cắt nhỏ để tăng mùi thơm và điểm xuyết màu sắc cho món ăn thêm bắt mắt. Tắt bếp, nhẹ nhàng múc cá ra đĩa hoặc bát sứ sâu lòng.

Món cá bống kho tộ ngon nhất là khi còn nóng hổi, ăn kèm với cơm trắng dẻo thơm, rau luộc hoặc dưa chua là đúng chuẩn vị cơm nhà truyền thống. Ngoài ra, bạn cũng có thể thưởng thức cùng bún tươi và rau sống để cảm nhận được sự đậm đà hòa quyện trong từng thớ cá và giọt nước kho sánh mịn.

Bí quyết nhỏ làm nên hương vị tuyệt vời cho món cá bống kho tộ

Để có được món cá bống kho tộ thơm ngon đúng chuẩn, ngoài việc tuân thủ các bước chế biến cơ bản, bạn còn cần lưu ý một vài mẹo nhỏ nhưng vô cùng quan trọng. Những bí quyết tưởng chừng đơn giản này lại chính là yếu tố quyết định đến độ đậm đà, thơm béo và hấp dẫn của món ăn dân dã này.

cá bống kho tộ

Trước hết là khâu chọn cá – nền tảng cho hương vị món ăn. Hãy ưu tiên lựa chọn cá bống còn tươi sống, kích thước vừa phải, thân cá săn chắc, mắt trong, mang hồng, không có dấu hiệu bị trầy xước hay chảy nhớt nhiều. Một con cá tươi không chỉ giữ được độ ngọt tự nhiên mà còn giúp hạn chế tối đa mùi tanh đặc trưng của cá nước ngọt. Tránh mua cá có mùi lạ, thân mềm nhũn hoặc có màu tái xanh – đó là dấu hiệu cho thấy cá đã để lâu và không còn đảm bảo chất lượng.

Khâu sơ chế cá cũng đóng vai trò vô cùng quan trọng. Cá bống thường có lớp nhớt trên da khiến mùi tanh dễ bám lại nếu không xử lý kỹ. Bạn có thể sử dụng muối hạt hoặc giấm ăn để chà nhẹ lên thân cá, giúp loại bỏ lớp nhớt và mùi tanh. Một mẹo nhỏ là kết hợp muối với một ít nước cốt chanh hoặc rượu trắng khi rửa cá sẽ làm tăng hiệu quả làm sạch và khử mùi. Sau khi chà xát, hãy rửa cá lại nhiều lần dưới vòi nước sạch để cá thật sự khô ráo và sẵn sàng cho quá trình ướp và kho.

Về phần gia vị, đừng tiết kiệm! Những nguyên liệu như hành tím, tỏi băm, ớt tươi và tiêu xay không chỉ giúp tạo nên hương vị đặc trưng cho món cá kho mà còn đóng vai trò là “trợ thủ” đắc lực trong việc khử tanh. Khi được phi thơm và hòa quyện vào cá trong quá trình kho, chúng giúp món ăn trở nên dậy mùi, nồng nàn và hấp dẫn hơn hẳn.

Một yếu tố không thể thiếu giúp nâng tầm món cá bống kho tộ chính là lựa chọn loại nồi phù hợp. Nếu có điều kiện, hãy ưu tiên sử dụng nồi đất hoặc nồi gang dày thay vì nồi inox thông thường. Những loại nồi này có khả năng giữ và truyền nhiệt tốt, giúp cá chín đều từ ngoài vào trong, gia vị thấm sâu vào từng thớ thịt, giữ được độ nóng lâu và giúp món ăn dậy mùi thơm đặc trưng rất khó cưỡng.

Chỉ cần ghi nhớ và áp dụng những mẹo nhỏ này, bạn hoàn toàn có thể biến món cá bống kho tộ tưởng chừng đơn giản thành một món ăn hấp dẫn, đậm đà hương vị quê nhà – đủ sức làm say lòng bất kỳ ai thưởng thức.

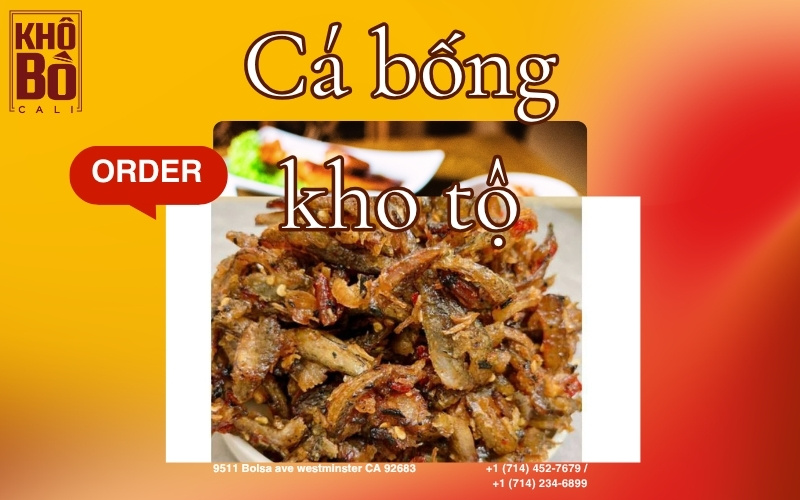
Nếu bạn là người yêu thích hương vị đậm đà, dân dã của cá bống kho tộ nhưng lại không có nhiều thời gian để chuẩn bị hay nấu nướng, thì đừng lo, Khô bò CALI đã sẵn sàng mang đến cho bạn một giải pháp tiện lợi và chuẩn vị. Với nguyên liệu tuyển chọn kỹ càng, cá bống tươi ngon được sơ chế sạch sẽ, kết hợp cùng công thức kho truyền thống, món cá bống kho tộ của Khô bò CALI giữ trọn vị thơm béo, đậm đà và dậy mùi hấp dẫn như cơm nhà mẹ nấu.

Chỉ cần vài phút hâm nóng, bạn đã có ngay một phần cá kho nóng hổi, sánh quyện nước sốt, ăn cùng cơm trắng là “hao cơm” vô cùng. Sản phẩm được đóng gói tiện lợi, phù hợp để mang theo khi đi làm, đi học hay làm quà biếu người thân ở xa. Đặc biệt, Khô bò CALI cam kết không chất bảo quản, không phẩm màu, đảm bảo an toàn vệ sinh thực phẩm – vì sức khỏe và sự hài lòng của khách hàng luôn là ưu tiên hàng đầu.

👉 Đặt mua cá bống kho tộ của Khô bò CALI ngay hôm nay để thưởng thức hương vị đậm chất miền quê trong từng miếng cá mềm thơm, thấm đẫm nước kho sóng sánh, giúp bữa ăn của bạn thêm phần tròn vị và tiện lợi hơn bao giờ hết!

📞 Gọi ngay: +1 (714) 452-7679 / +1 (714) 234-6899
💬 Inbox fanpage Khô Bò CALI để được tư vấn nhanh nhất!

How to make delicious and flavorful braised Goby fish in clay pot – an irresistible rice companion, easy to cook at home

Goby fish is a familiar ingredient in Vietnamese meals, often transformed into delicious dishes such as sour soup, caramelized goby fish, or braised goby fish. Today, let’s join Khô bò CALI in the kitchen and learn how to make braised Goby fish in clay pot, a flavorful dish that will surely add variety to your family’s daily meals!

Ingredients for Braised Goby Fish in Clay Pot (Serves 4)

Goby fish in clay pot

To prepare a rich and flavorful braised Goby fish dish for your family, you will need the following ingredients:

  • 400 grams of Goby fish – fresh and cleaned thoroughly

  • 50 ml of fresh coconut water – adds natural sweetness and enhances the aroma

  • 50 grams of crispy pork fat (tóp mỡ) – for extra flavor and richness

  • 10 fresh chili peppers – adjust to your preferred spice level

  • 6 stalks of green onions – chopped for garnish and added fragrance

  • 4 shallots – thinly sliced to enhance the dish’s aroma

  • 1 whole garlic bulb – minced for a bold and savory base

  • 1 fresh lime – used to eliminate fishy odor and balance the flavor

  • 3 tablespoons of caramel sauce (nước màu) – for color and depth

  • 1 tablespoon of cooking oil – to sauté aromatics

  • 4 tablespoons of fish sauce – the main seasoning component

  • 1 tablespoon of coarse salt – for cleaning and seasoning the fish

  • A pinch of common spices – such as salt, sugar, and ground pepper to taste

Tips for Choosing Fresh and Delicious Goby Fish

To make a truly flavorful and authentic braised Goby fish in clay pot, selecting the right fish is essential. It’s best to choose Goby fish that are medium-sized or slightly smaller. These tend to absorb the seasoning better and result in a more tender, flavorful dish.

When buying Goby fish, look for ones with firm flesh that bounces back when gently pressed. The skin should be shiny and intact, and the eyes should appear clear and bright — all signs of freshness. A healthy, slightly silvery appearance and a firm, compact body are good indicators that the fish is fresh and suitable for cooking.

Avoid any Goby fish that have dull, pale coloring, soft or mushy texture, or a strong, unpleasant odor. These are common signs that the fish is no longer fresh and may negatively affect the taste and safety of your dish.

How to Make Braised Goby Fish in Clay Pot

Step 1: Clean and Prepare the Goby Fish

Goby fish in clay pot

After purchasing the Goby fish, place them in a large bowl filled with water. Add 1 tablespoon of coarse salt and the juice of one freshly squeezed lime. Gently rub the fish for about 5 minutes using your hands. This step helps to remove the sliminess and reduce the fishy smell effectively.

Once done, rinse the fish thoroughly under clean running water and let them drain completely. For larger fish, cut them in half to make them easier to eat. Smaller ones can be left whole.

Step 2: Marinate the Fish

Goby fish in clay pot

Transfer the cleaned fish to a mixing bowl. Sprinkle 1 teaspoon of salt evenly over the fish and toss gently to coat. Let the fish marinate for about 20 minutes to allow the salt to penetrate and enhance the flavor.

Step 3: Prepare the Aromatics and Other Ingredients

Goby fish in clay pot

Peel and lightly crush the shallots. Do the same with the garlic, then mince it finely.
Wash the fresh chili peppers, remove the stems, and gently smash them to release their heat and aroma.
Trim the roots off the green onions, wash them well, and cut them into sections about the length of half a finger.

Step 4: Braise the Fish

Place a clay pot or heavy-bottomed pan over medium heat. Add 1 tablespoon of cooking oil. Once the oil is hot, sauté the minced garlic and crushed shallots until golden and fragrant.

Next, add the crispy pork fat (tóp mỡ) and stir briefly. Carefully layer the marinated Goby fish into the pot. Gently stir once or twice to make sure the fish is in contact with the base of the pot, which helps it cook evenly and keeps the aromatics from burning.

Goby fish in clay pot

Now, season the pot with 4 tablespoons of fish sauce and 1.5 teaspoons of sugar. Let everything simmer for about 5 minutes so the fish can begin absorbing the flavor.

Then add 1 teaspoon of salt, the smashed chili peppers, 3 tablespoons of caramel sauce (nước màu), and 50ml of fresh coconut water. Cover the pot with a lid and continue to simmer over low heat for about 30 minutes. This slow cooking process allows the fish to soak up all the delicious flavors and become tender and aromatic.

Step 5: Finish and Serve

Goby fish in clay pot

After 30 minutes, open the lid and check that the fish is fully cooked. Add the chopped green onions, 1 teaspoon of ground pepper, and a few slices of chili if you like extra heat. Taste and adjust the seasoning if needed. Once satisfied, turn off the heat and carefully transfer the fish to a serving plate.

Final Result

Your braised Goby fish in clay pot is now ready to enjoy! The dish bursts with a rich aroma of scallions, black pepper, and chili. The fish is sweet, firm, and not mushy, enhanced by the mild heat of the chilies and the savory richness from crispy pork fat. It’s best served hot with freshly steamed white rice, but you can also pair it with vermicelli noodles or fresh herbs for a more refreshing twist.

Don’t Have Time to Cook? Order Our Signature Braised Goby Fish from Khô Bò CALI!

Love the rich flavor of braised Goby fish in clay pot but don’t have the time to prepare it yourself? Don’t worry, at Khô Bò CALI, we’ve perfected this traditional dish using the freshest ingredients and an authentic home-style recipe. Each portion is slow-cooked to perfection with tender goby fish, rich coconut water, fragrant spices, and crispy pork fat, just like grandma used to make.

Whether you’re craving a nostalgic Vietnamese meal or want to impress your guests with a flavorful dish, our ready-to-eat Goby fish in clay pot is the perfect choice. Simply reheat and serve with steamed rice for a delicious, heartwarming meal in minutes.

👉 Order now from Khô Bò CALI and bring home the taste of tradition, convenience, and quality in every bite!

Khô cá đù làm món gì ngon? Gợi ý 4 cách chế biến khô cá đù dễ làm, cực bắt cơm

Khô cá đù không chỉ đơn thuần là nguyên liệu quen thuộc cho những món chiên giòn rụm mà còn có thể biến tấu thành nhiều món ăn mới lạ, đậm đà và đầy hấp dẫn. Nếu bạn đang muốn “đổi gió” cho mâm cơm gia đình thì đừng bỏ lỡ 4 cách chế biến khô cá đù cực dễ dưới đây, vừa nhanh gọn lại vừa khiến cả nhà ăn mãi không chán. Hãy cùng vào bếp và khám phá ngay nhé!

Khô cá đù cháy tỏi

Khô cá đù cháy tỏi là món ăn đơn giản nhưng mang hương vị đậm đà, giòn thơm đầy hấp dẫn. Miếng cá giòn rụm bên ngoài, bên trong vẫn giữ được độ dai nhẹ đặc trưng, thấm đẫm nước sốt mặn ngọt và mùi thơm nức mũi của tỏi phi, chắc chắn sẽ khiến bạn “ăn là ghiền”.

Nguyên liệu chuẩn bị (cho 2 người)

Khô cá đù

  • Khô cá đù: 1kg

  • Hành tím: 2 củ

  • Tỏi: 2 tép

  • Ớt hiểm: 2 trái

  • Đậu phộng rang: 1 muỗng canh (giã nhuyễn)

  • Nước mắm: 4 muỗng canh

  • Giấm: 1 muỗng cà phê

  • Đường thốt nốt: 30g (1 viên nhỏ)

  • Dầu ăn: 315ml

Các bước thực hiện

Bước 1: Sơ chế nguyên liệu
Khô cá đù rạch dọc bụng, lọc bỏ phần xương để khi ăn không bị lợn cợn. Tỏi bóc vỏ, băm nhuyễn. Hành tím cắt lát mỏng. Ớt hiểm bỏ hạt, băm nhuyễn.

Bước 2: Chiên cá
Cho khoảng 300ml dầu ăn vào chảo, đun lửa vừa. Khi dầu bắt đầu sôi lăn tăn, cho khô cá đù vào chiên vàng đều hai mặt trong khoảng 10–13 phút. Vớt ra để ráo dầu.

Bước 3: Làm nước sốt cháy tỏi
Dùng chảo khác, đổ phần dầu ăn còn lại vào, phi thơm tỏi, ớt và hành tím. Sau đó cho nước mắm, giấm, đường thốt nốt và đậu phộng rang vào, đảo đều hỗn hợp đến khi sôi nhẹ và hơi sánh lại.

Bước 4: Rim khô cá đù
Cho phần khô cá đù đã chiên vào chảo sốt, đảo đều tay khoảng 5–7 phút để cá thấm đều nước sốt. Khi nước sốt bám đều vào từng miếng cá và có màu vàng cánh gián đẹp mắt thì tắt bếp.

Thành phẩm

Món khô cá đù cháy tỏi khi hoàn thành có màu sắc bắt mắt, mùi thơm lan tỏa cực kỳ hấp dẫn. Vị giòn của cá, vị mặn ngọt đậm đà cùng độ cay nhẹ của ớt hòa quyện tạo nên một món ăn “hao cơm” đúng nghĩa. Đặc biệt, phần tỏi phi vàng rưới lên trên sẽ khiến hương vị thêm bùng nổ. Rất lý tưởng để thưởng thức trong bữa cơm gia đình hoặc làm món nhậu lai rai cuối tuần!

Khô cá đù rim mắm tỏi

Nếu bạn yêu thích vị mặn mà xen lẫn chút ngọt thanh và hương cay nồng đặc trưng của tỏi ớt, thì khô cá đù rim mắm tỏi chắc chắn là món ngon bạn không nên bỏ lỡ. Không cầu kỳ, không tốn nhiều thời gian, nhưng thành phẩm lại khiến cả nhà “đánh bay” nồi cơm trong tích tắc!

Khô cá đù

Nguyên liệu (cho 3 người)

  • Khô cá đù: 300g

  • Tỏi: 4 tép (băm nhuyễn)

  • Ớt hiểm: 2 trái (băm nhỏ)

  • Tương ớt: 1 muỗng canh

  • Giấm: 1 muỗng canh

  • Nước mắm: 1 muỗng canh

  • Đường: 2 muỗng canh

  • Nước lọc: 1 muỗng canh

  • Dầu ăn: 7 muỗng canh

Cách làm chi tiết

Bước 1: Pha nước sốt thần thánh
Cho vào chén: 1 muỗng nước lọc, 1 muỗng nước mắm, 1 muỗng tương ớt, 1 muỗng giấm và 2 muỗng đường. Khuấy đều cho đến khi hỗn hợp hòa tan, tạo nên phần sốt sánh ngọt, đậm đà và thơm nhẹ.

Bước 2: Chiên khô cá đù
Đun nóng 4 muỗng dầu ăn trong chảo, cho khô cá đù vào chiên vàng giòn hai mặt (khoảng 10–13 phút). Khi cá đã lên màu đẹp, vớt ra để ráo dầu.

Bước 3: Rim cùng sốt mắm tỏi
Dùng chảo khác, cho 3 muỗng dầu ăn vào, phi thơm tỏi và ớt. Khi dậy mùi, đổ phần nước sốt đã pha vào, đảo đều tay khoảng 2–3 phút đến khi hỗn hợp sánh lại. Sau đó, cho phần cá chiên vào, đảo đều nhẹ tay để cá thấm sốt, rim thêm 7–10 phút là hoàn tất.

Thành phẩm

Món khô cá đù rim mắm tỏi có màu vàng nâu óng ả, hương thơm của tỏi phi quyện cùng nước mắm đậm vị làm ai ngửi cũng khó lòng cưỡng lại. Miếng cá giòn nhẹ bên ngoài, mềm bên trong, thấm đều vị mặn – ngọt – cay, cực kỳ bắt cơm. Đây chắc chắn là món ngon “đưa cơm” mà bất cứ ai cũng nên thử làm ít nhất một lần!

Khô cá đù rim me

Chẳng cần nguyên liệu cầu kỳ hay cách làm phức tạp, chỉ với vài bước đơn giản, bạn đã có thể biến món khô cá đù quen thuộc thành một tuyệt phẩm “đưa cơm” đúng nghĩa – khô cá đù rim me. Vị chua nhẹ của me, hòa quyện cùng chút ngọt, chút cay và hương thơm ngào ngạt từ tỏi phi, đảm bảo sẽ khiến mọi bữa cơm trở nên đậm đà khó quên.

Khô cá đù

Nguyên liệu (cho 3 người ăn)

  • Khô cá đù: 200g

  • Me chín: 20g (tương đương 1 vắt nhỏ)

  • Tỏi: 2 tép (băm nhuyễn)

  • Đường: 4 muỗng cà phê

  • Bột ngọt: 1/2 muỗng cà phê

  • Dầu ăn: 230ml

  • Nước sôi: khoảng 70ml để pha me

Hướng dẫn thực hiện

Bước 1: Làm nước sốt me chua ngọt
Cho vắt me vào chén cùng 70ml nước sôi. Dùng muỗng nhẹ nhàng dằm cho me tan hết, rồi lọc bỏ xác, giữ lại phần nước cốt. Tiếp tục cho đường và bột ngọt vào khuấy đều đến khi hòa tan hoàn toàn – đây chính là “linh hồn” của món ăn, quyết định hương vị đậm đà, tròn vị.

Bước 2: Chiên giòn khô cá đù
Làm nóng 200ml dầu ăn trên chảo, cho khô cá đù vào chiên vàng đều hai mặt trong khoảng 10–13 phút. Khi cá chuyển màu đẹp, giòn rụm bên ngoài là được – vớt ra để ráo dầu.

Bước 3: Rim cùng nước sốt me
Dùng một chiếc chảo khác, cho 2 muỗng dầu ăn vào phi thơm tỏi băm. Khi tỏi dậy mùi vàng nhẹ, đổ phần nước sốt me đã chuẩn bị vào, đảo đều trong 2–3 phút để sốt sánh lại. Cuối cùng, cho phần cá đù chiên vào, rim lửa nhỏ trong khoảng 15–20 phút cho cá ngấm đều gia vị.

Thành phẩm

Thế là xong! Món khô cá đù rim me thơm lừng, đậm vị, hấp dẫn cả về hương lẫn sắc. Miếng cá giòn nhẹ, quyện trong lớp nước sốt sánh chua ngọt hài hòa, điểm thêm chút cay của tỏi phi – thật sự là “vũ khí bí mật” để chinh phục mọi thành viên trong gia đình. Còn gì tuyệt vời hơn khi ăn cùng cơm trắng nóng hổi vào một ngày se lạnh?

Xem thêm: [Bí quyết] Làm khô bò mềm thơm, đậm đà hương vị ngay tại nhà

Khô cá đù chưng thịt

Ai nói món khô chỉ đơn giản là đem chiên hay rim? Hôm nay, hãy thử biến tấu với một công thức đậm đà và hấp dẫn không ngờ: khô cá đù chưng thịt ba chỉ. Sự kết hợp giữa vị mằn mặn đặc trưng của cá khô và độ béo ngậy, mềm thơm của thịt ba chỉ, cộng hưởng cùng tiêu xanh, hành tím, ớt hiểm – sẽ tạo nên một hương vị khó quên trong từng miếng cơm.

Khô cá đù

Nguyên liệu (cho 2 người ăn)

  • Khô cá đù: 100g

  • Thịt ba chỉ: 100g

  • Hành tím: 5 củ (lột vỏ, thái lát)

  • Ớt hiểm: 2 trái (cắt khúc)

  • Tiêu xanh: 20g

  • Dầu điều: 1 muỗng canh

  • Gia vị: muối, đường, bột ngọt (lượng vừa đủ)

Bí quyết chọn thịt ba chỉ ngon

Hãy chọn miếng thịt có màu hồng tươi, lớp mỡ và nạc xen kẽ đều, khi ấn vào cảm thấy săn chắc, không mềm nhũn hay chảy nhớt. Thịt tươi sẽ giữ được độ ngọt tự nhiên và tạo độ béo vừa phải cho món ăn, thơm ngon hơn nhiều so với thịt đông lạnh.

Các bước thực hiện

Bước 1: Sơ chế nguyên liệu
Cá đù rửa sơ với nước cho sạch bụi, để ráo. Thịt ba chỉ chà qua với muối để khử mùi, rửa sạch rồi cắt miếng vừa ăn. Chuẩn bị hành tím thái lát, ớt hiểm và tiêu xanh để tăng thêm độ thơm và cay nhẹ cho món chưng.

Bước 2: Ướp nguyên liệu
Cho cá đù, thịt ba chỉ, hành tím, ớt, tiêu xanh vào tô. Thêm vào 1 muỗng canh dầu điều, 1 muỗng cà phê đường và 1/3 muỗng cà phê bột ngọt. Trộn thật đều tay để tất cả nguyên liệu thấm đều gia vị. Để yên khoảng 10 phút trước khi đem hấp.

Bước 3: Chưng cách thủy
Xếp toàn bộ nguyên liệu vào nồi đất nhỏ. Đặt nồi vào xửng hấp, phần dưới cho khoảng 200ml nước. Hấp cách thủy với lửa nhỏ trong khoảng 60 phút cho đến khi thịt mềm, cá chín và nước sánh nhẹ, đậm vị.

Thành phẩm

Mở nắp xửng ra, hương thơm quyến rũ lan tỏa khắp gian bếp – mùi tiêu cay nồng, mùi hành tím bốc lên thơm lừng, vị cá đù mằn mặn quyện cùng thịt ba chỉ mềm béo, tất cả hòa quyện như một bản giao hưởng vị giác.

Một món ăn dân dã mà chất lượng chẳng kém gì đặc sản nhà hàng. Húp một thìa nước chưng đậm đà cay nhẹ, gắp một miếng thịt và cá đưa vào miệng – chỉ có thể thốt lên: “tuyệt cú mèo!”. Đừng quên bới thêm chén cơm trắng đầy để thưởng thức trọn vẹn món ngon này nhé!

Nếu bạn đang muốn thử sức với những món ngon từ khô cá đù, thì việc chọn đúng nguyên liệu là vô cùng quan trọng. Và Khô cá đù của Khô Bò CALI chính là lựa chọn lý tưởng dành cho bạn.

Khô cá đù

🌞 Khô cá đù tại Khô Bò CALI được chế biến từ cá tươi đánh bắt trong ngày, phơi nắng tự nhiên, không tẩm hóa chất, đảm bảo vị đậm đà, dai nhẹ vừa ăn, giữ trọn hương vị quê nhà. Mỗi miếng khô đều được tuyển chọn kỹ lưỡng, đóng gói sạch sẽ và vận chuyển nhanh chóng đến tận tay khách hàng.

👉 Đặt mua ngay tại Khô Bò CALI để có nguyên liệu chất lượng, an toàn cho bữa cơm thêm tròn vị.
📞 Liên hệ fanpage hoặc website của Khô Bò CALI để được tư vấn và giao hàng nhanh toàn quốc.

What can you make with dried croaker fish? 4 easy and delicious dried croaker fish recipes.

Until now, dried croaker fish has mostly been known for its fried dishes, right? But today, Khô bò CALI will reveal some brand-new recipes using dried croaker fish. Let’s head to the kitchen and try out 4 delicious dishes made from dried croaker fish!

Dried Croaker Fish with Garlic Sauce

dried croaker fish

Ingredients (Serves 2):

  • Dried croaker fish: 1 kg

  • Shallots: 2 bulbs

  • Garlic: 2 cloves

  • Bird’s eye chili: 2

  • Roasted peanuts: 1 tbsp

  • Fish sauce: 4 tbsp

  • Vinegar: 1 tsp

  • Palm sugar: 30g (1 piece)

  • Cooking oil: 315 ml

Instructions:

Step 1: Prepare the ingredients

Start by using a knife to split the dried croaker fish in half lengthwise along the belly, then remove the bones.

Next, peel the garlic and shallots. Finely mince the garlic, thinly slice the shallots. Remove the seeds from the chili, then finely chop them as well.

Step 2: Fry the dried fish

Place a pan on medium heat with 300ml of cooking oil. Once the oil begins to bubble slightly, add in 1kg of dried croaker fish. Fry for about 10–13 minutes until both sides turn golden and crispy. Remove and set aside.

Step 3: Make the garlic sauce

In another pan, add the remaining 15ml (1 tbsp) of oil along with the minced garlic, chopped chili, and sliced shallots. Sauté until fragrant.

Then, add 4 tbsp of fish sauce, 1 tbsp of crushed roasted peanuts, 30g (1 piece) of palm sugar, and 1 tsp of vinegar.

Stir the sauce for about 5–7 minutes, then add the fried dried croaker fish and continue stirring for another 5–7 minutes. Once the fish absorbs the sauce and is evenly coated, adjust the seasoning to taste and remove from heat.

Final Result:

Now it’s time to plate and enjoy your flavorful garlic-glazed dried croaker fish! This dish is a perfect choice for a weekend treat.

The dried croaker fish is crispy and golden, coated with a savory-sweet sauce that’s incredibly appetizing. For an extra kick of flavor, try topping it with a bit of toasted garlic—it makes the dish even more aromatic and delicious!

Dried Croaker Fish Simmered in Garlic Fish Sauce

dried croaker fish

Ingredients (Serves 3):

  • Dried croaker fish: 300g

  • Garlic: 4 cloves

  • Bird’s eye chili: 2

  • Chili sauce: 1 tbsp

  • Vinegar: 1 tbsp

  • Fish sauce: 1 tbsp

  • Cooking oil: 7 tbsp

  • Sugar: 2 tbsp

Instructions:

Step 1: Make the sauce

In a small bowl, mix together 1 tbsp water, 1 tbsp fish sauce, 1 tbsp chili sauce, 1 tbsp vinegar, and 2 tbsp sugar. Stir until well combined.

Step 2: Fry the dried fish

Heat 4 tbsp of cooking oil in a pan over medium heat. When the oil starts to sizzle, add 300g of dried croaker fish and fry for 10–13 minutes until both sides are golden and crispy. Remove from pan and set aside.

Step 3: Simmer the fish

In another pan, heat 3 tbsp of oil. Add the minced garlic (4 cloves) and chopped chili (2 chilies), and sauté until fragrant. Then pour in the sauce mixture and stir for about 3 minutes.

Finally, add the fried dried croaker fish to the pan and simmer for 7–10 minutes, allowing the fish to fully absorb the sauce. Taste and adjust seasoning if needed, then remove from heat and serve.

Final Result:

So, what do you think of this dried croaker fish simmered in garlic fish sauce? At Điện máy XANH, we’re absolutely hooked on it!

Each crispy bite of dried croaker fish is coated in a perfectly balanced sweet and savory sauce, with a gentle kick of heat from the chili and garlic. This dish is guaranteed to be a rice-scooping favorite at your table!

Dried Croaker Fish Simmered in Tamarind Sauce

dried croaker fish

Ingredients (Serves 3):

  • Dried croaker fish: 200g

  • Tamarind: 20g (1 pressed portion)

  • Garlic: 2 cloves

  • Cooking oil: 230ml

  • Sugar/MSG: a pinch

Instructions:

Step 1: Prepare the tamarind sauce

In a bowl, combine 20g of tamarind with 70ml of hot water. Use a spoon to gently press and stir until the tamarind dissolves, then strain out the solids, keeping only the tamarind juice.

Add ½ tsp of MSG and 4 tsp of sugar to the juice and stir until fully dissolved.

Step 2: Fry the dried croaker fish

Heat 200ml of cooking oil in a pan over medium heat. Once the oil is hot, fry the 200g of dried croaker fish for 10–13 minutes, until both sides are golden and crispy. Remove and drain excess oil.

Step 3: Simmer the fish

In another pan, heat 30ml (2 tbsp) of oil and sauté 2 finely chopped garlic cloves until fragrant. Add the tamarind sauce and stir for about 3 minutes.

Then, add the fried dried croaker fish to the pan and simmer for 15–20 minutes until the sauce thickens. Taste and adjust seasoning if needed, then turn off the heat and serve.

Final Result:

And that’s it—your dried croaker fish simmered in tamarind sauce is ready to serve! Just a few simple tweaks can elevate your family meal to the next level.

The crispy dried croaker fish pairs perfectly with the tangy, sweet tamarind sauce and the bold aroma of garlic. It’s simply irresistible—best served hot with a bowl of steaming white rice!

Steamed Dried Croaker Fish with Pork Belly

dried croaker fish

Ingredients (Serves 2):

  • Dried croaker fish: 100g

  • Pork belly: 100g

  • Shallots: 5 bulbs

  • Bird’s eye chili: 2

  • Green peppercorns: 20g

  • Annatto oil: 1 tbsp

  • Basic seasonings: a pinch (salt, sugar, MSG)

How to Choose Fresh Pork Belly:

High-quality pork belly should have a natural pinkish color with no dark spots, discoloration, or black specks.
When pressed, it should feel firm and springy, not slimy or overly soft.
For the best flavor, fresh pork belly is recommended over frozen.

Instructions:

Step 1: Prepare the ingredients

Rinse the dried croaker fish with clean water and let drain. Gently rub the pork belly with salt, then rinse thoroughly.

Cut the dried fish in half and chop the pork belly into bite-sized pieces.

Peel the shallots and slice thinly. Cut the chilies into short segments.

Step 2: Marinate

In a mixing bowl, combine 100g of dried croaker fish, 100g of pork belly, 5 sliced shallots, 2 chopped chilies, 20g of green peppercorns, ⅓ tsp MSG, 1 tsp sugar, and 1 tbsp annatto oil.

Mix well and let the ingredients marinate for 10 minutes to absorb the flavors.

Step 3: Steam

Transfer all the marinated ingredients to a small clay pot and place it in the top tier of a steamer.

Add 200ml of water to the lower tier of the steamer, cover, and steam over low heat for 60 minutes, until the dried fish and pork belly are fully cooked and tender.

Final Result:
Your steamed dried croaker fish with pork belly is ready to enjoy! The moment the rich aroma fills the kitchen, it’s sure to draw everyone in.

Tender dried fish meets juicy pork belly, all infused with savory spices. The sauce is mildly spicy, with the kick of green peppercorns adding a unique twist. It’s the perfect dish to pair with a steaming bowl of white rice—don’t wait, dig in!

Buy Premium Dried Croaker Fish at Khô Bò CALI – Rich Flavor, Authentic Quality!

If you’re looking for high-quality dried croaker fish to make delicious dishes like fish rimmed with garlic fish sauce, tamarind sauce, or steamed with pork belly, then Khô Bò CALI is the perfect choice you shouldn’t miss.

At Khô Bò CALI, our dried croaker fish is carefully selected from the freshest catches, naturally sun-dried to perfection, retaining the right chewiness and natural sweetness—completely free from preservatives.

👉 Guaranteed quality – Traditional flavor – Nationwide delivery available.
👉 The more you buy, the better the price – Perfect for family meals or as a meaningful gift.

Order now via Khô Bò CALI’s Fanpage or call our hotline for personalized support and exclusive offers!

[Bí quyết] Làm khô bò mềm thơm, đậm đà hương vị ngay tại nhà

Với hương vị cay nhẹ, ngọt mặn hài hòa và độ dai vừa phải, khô bò mềm luôn nằm trong danh sách những món ăn vặt “gây nghiện” đối với nhiều người. Dù là nhâm nhi lúc xem phim, tán gẫu cùng bạn bè hay làm mồi nhậu lai rai, món ăn này đều khiến người thưởng thức khó lòng cưỡng lại.

Chỉ cần xé vài miếng khô bò mềm, thêm chút nước cốt chanh và vài lát ớt, bạn sẽ cảm nhận được trọn vẹn vị ngon lan tỏa nơi đầu lưỡi. Và trong bài viết hôm nay, hãy cùng Khô bò CALI khám phá cách làm khô bò mềm ngay tại nhà thơm ngon, chuẩn vị chẳng kém gì ngoài tiệm!

Hướng dẫn chi tiết cách làm khô bò mềm đậm đà, thấm vị tại nhà

Để có được món khô bò mềm ngon chuẩn vị – vừa dai, vừa thơm và thấm đều gia vị – khâu chuẩn bị nguyên liệu đóng vai trò rất quan trọng. Mỗi thành phần không chỉ góp phần tạo nên hương vị đặc trưng mà còn giúp thịt bò giữ được độ mềm mọng hấp dẫn.

khô bò mềm

Nguyên liệu bạn cần chuẩn bị bao gồm:

  • 500 gram thịt bò (nên chọn phần thăn bò hoặc bắp bò để đảm bảo độ dai mềm vừa phải)

  • 1 củ tỏi (bóc vỏ, giã nhuyễn)

  • 10 củ hành tím (bóc vỏ, xay nhuyễn hoặc băm nhỏ)

  • 1/4 củ gừng tươi (giã nhỏ, vắt lấy nước cốt)

  • 8 nhánh sả (đập dập, cắt khúc hoặc xay nhuyễn để ướp)

  • 1 muỗng cà phê ngũ vị hương (tăng độ thơm và chiều sâu hương vị)

  • 1 muỗng cà phê bột nghệ (tạo màu và tốt cho sức khỏe)

  • 1 muỗng cà phê bột điều (giúp thịt có màu đỏ nâu hấp dẫn)

  • 1 muỗng cà phê bột cà ri (tăng hương vị đậm đà, quyến rũ)

  • 2 muỗng canh ớt bột (có thể gia giảm tùy khẩu vị cay)

  • 2 muỗng canh giấm (giúp thịt mềm hơn và át mùi gây)

  • 2 muỗng canh dầu hào (làm dậy vị umami cho món ăn)

  • 1 muỗng canh dầu ăn (giúp gia vị bám đều hơn khi ướp)

  • 1 muỗng canh nước mắm (góp phần tạo nên vị đậm đà đặc trưng của khô bò)

  • Một ít gia vị thông dụng khác như muối, đường, hạt nêm,… (gia giảm vừa miệng tùy theo sở thích)

Với những nguyên liệu này, bạn đã sẵn sàng để bắt tay vào làm món khô bò mềm thơm lừng, thấm đều gia vị – món ăn vặt khiến bao người mê mẩn!

Xem thêm: Công thức làm khô bò sợi cay ngon đơn giản

Cách chế biến món khô bò mềm thơm ngon, đậm vị ngay tại nhà

Khô bò – món ăn vặt không bao giờ lỗi thời – có thể được chế biến thành hai kiểu phổ biến là khô bò miếng lớn hoặc khô bò xé sợi, tùy theo khẩu vị và sở thích của từng gia đình. Dù là bạn yêu thích cảm giác dai dai khi nhâm nhi từng miếng thịt lớn, hay thích từng sợi bò khô mềm thấm đều gia vị, thì quy trình chế biến nhìn chung khá giống nhau. Sự khác biệt chủ yếu nằm ở khâu sơ chế thịt bò – bước quyết định hình dáng và độ thấm gia vị của thành phẩm.

Bước 1: Sơ chế thịt bò đúng cách để khử mùi và tạo độ dai chuẩn

khô bò mềm

Ngay khi mua về, bạn nên rửa sạch thịt bò với 2 muỗng canh giấm và một ít muối, dùng tay chà xát đều trong khoảng 5–7 phút để loại bỏ mùi hôi đặc trưng. Sau đó rửa lại bằng nước sạch 2–3 lần và để ráo hoàn toàn.

Tùy theo cách chế biến, bạn có thể:

  • Cắt thịt thành miếng lớn, bản to dày khoảng 0.5cm (nếu làm khô bò miếng),

  • Hoặc cắt thành miếng nhỏ vừa ăn để dễ xé sợi hơn sau khi sấy (nếu làm bò khô xé sợi).

Lưu ý quan trọng: Hãy luôn cắt dọc thớ thịt để giữ được độ dai và kết cấu đặc trưng của bò khô mềm.

Trong lúc chờ thịt ráo, bạn chuẩn bị các nguyên liệu ướp:

  • Sả: rửa sạch, bỏ phần già, đập dập và băm nhuyễn.

  • Hành tím, tỏi: bóc vỏ, băm nhuyễn.

  • Gừng: cạo vỏ, đập dập hoặc băm nhỏ.

Bước 2: Ướp thịt bò để thấm đẫm gia vị

khô bò mềm

Cho toàn bộ thịt bò đã sơ chế vào tô lớn, lần lượt cho vào:

  • Sả, tỏi, hành tím, gừng đã băm nhuyễn,

  • 2 muỗng canh đường, 2 muỗng canh hạt nêm, 1 muỗng canh nước mắm, 1 muỗng canh dầu ăn,

  • 1 muỗng cà phê ngũ vị hương, 1 muỗng cà phê bột nghệ, 1 muỗng cà phê bột điều, 1 muỗng cà phê bột cà ri,

  • 2 muỗng canh ớt bột (gia giảm theo khẩu vị cay của bạn),

  • Và cuối cùng là 2 muỗng canh dầu hào.

Dùng tay (hoặc đũa) trộn thật đều trong 3–5 phút để thịt thấm đều tất cả gia vị. Sau đó, bọc kín bằng màng bọc thực phẩmướp trong ngăn mát tủ lạnh ít nhất 8 tiếng hoặc để qua đêm để thịt đạt độ ngấm vị tối ưu.

Bước 3: Sấy thịt bò – linh hoạt với 3 cách đơn giản tại nhà

khô bò mềm

Sau khi thịt đã ướp đủ thời gian, bạn có thể lựa chọn 1 trong 3 phương pháp sấy dưới đây tùy theo điều kiện và thiết bị có sẵn:

Sấy bằng ánh nắng mặt trời

Cách truyền thống nhưng hiệu quả nếu thời tiết thuận lợi. Trước khi phơi, bạn nên tán nhẹ thịt cho mềm hoặc xé thành sợi nhỏ, giúp quá trình làm khô diễn ra nhanh hơn.

  • Thời gian phơi sẽ tùy thuộc vào mức độ nắng và độ khô mong muốn.

  • Ưu điểm: thịt có hương vị tự nhiên, thơm mùi nắng.

  • Lưu ý: cần che chắn cẩn thận để tránh bụi bẩn hoặc côn trùng.

Sấy bằng nồi chiên không dầu

Cách làm nhanh, sạch và tiện lợi cho mọi căn bếp hiện đại:

  • Làm nóng nồi trước ở nhiệt độ 100°C.

  • Xếp thịt vào nồi thành từng lớp mỏng, tránh chồng lên nhau.

  • Sấy trong 30 phút ở 100°C. Nếu muốn khô hơn, có thể sấy thêm 5–10 phút.

Sấy bằng lò nướng

Phù hợp khi cần làm với số lượng lớn:

  • Làm nóng lò trước 5–10 phút ở 100°C.

  • Xếp thịt lên khay nướng có lót giấy nến hoặc vỉ nướng.

  • Sấy thịt trong 90 phút ở 100°C, nhớ lật mặt thịt 10 phút một lần để chín đều.

  • Nếu muốn thịt khô hơn, có thể nướng thêm 10–15 phút.

Xem thêm: Cách làm khô bò miếng thơm ngon chuẩn vị

Thành phẩm sau khi hoàn tất

Sau khi sấy khô và để nguội hoàn toàn, từng miếng bò khô đã thấm đẫm gia vị, dậy mùi thơm của sả, tỏi và ngũ vị hương sẽ được bảo quản trong lọ thủy tinh sạch, khô ráo và có nắp đậy kín. Nên đặt lọ ở nơi thoáng mát, tránh tiếp xúc với ánh nắng trực tiếp để giữ được độ khô, độ ngon cũng như hương vị đậm đà lâu dài cho món bò khô.

Mỗi lần thưởng thức, bạn có thể vắt thêm vài giọt nước cốt chanh hoặc nước tắc lên miếng thịt để tăng thêm độ chua nhẹ, kích thích vị giác, đồng thời làm bật lên hương thơm tự nhiên của các loại gia vị đã ướp. Đây là bí quyết nhỏ giúp món bò khô trở nên hấp dẫn và cân bằng vị hơn, không bị khô khốc hay mặn gắt.

Bò khô miếng sau khi hoàn thành có màu sắc hấp dẫn, thớ thịt săn chắc, dai vừa phải, không bị quá khô hay quá mềm, mang vị ngọt tự nhiên của thịt quyện cùng vị mặn mà, cay nồng nhẹ của gia vị. Dù dùng để làm món ăn vặt trong những buổi tụ họp gia đình, bạn bè, hay làm món nhắm lý tưởng cho những cuộc vui cuối tuần, bò khô vẫn luôn là lựa chọn tuyệt vời không thể thiếu.

Bí quyết bảo quản khô bò chuẩn, giữ được vị ngon lâu dài

Để giữ cho khô bò luôn thơm ngon, dai chuẩn vị và không bị ẩm mốc trong quá trình sử dụng, việc bảo quản đúng cách là vô cùng quan trọng. Ngay sau khi hoàn tất các công đoạn chế biến, bạn nên để thịt nguội hoàn toàn rồi cho vào túi ni lông hoặc hộp thủy tinh có nắp đậy kín. Lưu ý đặt ở nơi khô ráo, thoáng mát, tránh tiếp xúc với độ ẩm hoặc ánh nắng mặt trời để hạn chế tình trạng khô bò bị mềm, lên men hay mốc hỏng.

Nếu có ý định sử dụng trong vòng vài ngày đến một tuần, bạn có thể bảo quản khô bò ở nhiệt độ phòng mát mẻ hoặc đặt trong ngăn mát tủ lạnh để thuận tiện khi lấy ra dùng. Tuy nhiên, nếu muốn giữ thịt bò khô được lâu hơn từ 3–6 tháng, hãy đảm bảo miếng khô đã được sấy thật khô và cho vào ngăn đông tủ lạnh. Cách này giúp thịt giữ được hương vị đặc trưng mà vẫn đảm bảo an toàn thực phẩm.

Ngoài ra, nếu bạn không bảo quản bằng tủ lạnh, sau khoảng 2–3 tuần nên đem thịt bò ra phơi nắng lại hoặc sấy sơ bằng lò nướng/nồi chiên không dầu để tránh tình trạng ẩm mốc do khí hậu. Đặc biệt, nếu có điều kiện, hãy sử dụng túi hút chân không trước khi cất giữ. Việc loại bỏ hết không khí trong túi sẽ giúp kéo dài thời gian bảo quản, giữ nguyên hương vị và độ tươi ngon của từng miếng khô bò như lúc mới làm.

Để thưởng thức trọn vẹn hương vị bò khô đúng điệu mà không cần tốn quá nhiều thời gian chế biến tại nhà, bạn có thể lựa chọn khô bò thượng hạng cay mềm của Khô Bò CALI – thương hiệu được nhiều tín đồ ăn vặt tin dùng.

Khô bò thượng hạng của Khô bò CALI được chế biến từ 100% thịt bò tươi tuyển chọn, giữ trọn độ ngọt thịt tự nhiên, kết hợp với công thức gia vị độc quyền mang đến vị cay nồng vừa phải, đậm đà, thấm đều từng thớ thịt. Miếng bò mềm dai, không quá khô cứng, rất dễ ăn, phù hợp với cả người lớn lẫn giới trẻ mê đồ ăn vặt.

Điểm đặc biệt không chỉ nằm ở hương vị, mà còn ở độ an toàn, vệ sinh thực phẩm và quy trình chế biến khép kín. Dù dùng làm món nhâm nhi khi xem phim, tụ tập bạn bè hay làm quà biếu sang trọng trong các dịp lễ, khô bò cay mềm của Khô Bò CALI luôn là lựa chọn xứng tầm.

👉 Nếu bạn đang tìm một món bò khô vừa tiện lợi, vừa ngon miệng, lại đảm bảo chất lượng cao – đừng bỏ qua Khô bò CALI. Một lần thử là nhớ mãi!

📞 Gọi ngay: +1 (714) 452-7679 / +1 (714) 234-6899
💬 Inbox fanpage Khô Bò CALI để được tư vấn nhanh nhất!

Pocket these 2 delicious recipes for spicy lemongrass dried beef — perfect for warming up on chilly days

Have you tried making spicy lemongrass dried beef at home? At first glance, it might sound like the familiar stir-fried beef with lemongrass and chili, but this dish is far more intricate in preparation. Still, the end result is well worth the effort  rich, aromatic, and irresistibly flavorful. If you’re not sure how to make it yet, check out these two great recipes from Khô bò CALI!

Spicy Lemongrass Dried Beef – Rich, Aromatic, and Full of Flavor

spicy lemongrass dried beef

This dish is a flavorful fusion of tender beef, aromatic lemongrass, and the gentle heat of chili — perfect for family meals or cozy weekend dinners. Here’s what you’ll need to prepare a hearty portion for 4 people:

Ingredients for Spicy Lemongrass Dried Beef (serves 4):

  • Beef brisket or your preferred cut – 600g (tender and flavorful, ideal for slow cooking)

  • Lemongrass stalks – 6 (lightly smashed and finely chopped to release their aroma)

  • Chili pepper – 1 (adjust to taste for your desired level of heat)

  • Fish sauce – 2 tablespoons (for that classic umami-rich base)

  • Soy sauce – 1.5 tablespoons (adds depth and color)

  • Oyster sauce – 1 tablespoon (enhances the richness of the meat)

  • Cooking oil – 2 tablespoons

  • Garlic oil – ½ tablespoon (for added aroma; can be homemade by frying minced garlic until golden)

  • Sugar – ½ tablespoon (balances out the savory elements)

  • MSG (optional) – ½ teaspoon (to round out the flavors)

With these simple yet carefully chosen ingredients, you’ll be well on your way to creating an unforgettable spicy lemongrass dried beef dish that brings warmth and satisfaction to any meal.

How to Prepare Spicy Lemongrass Dried Beef

Step 1: Preparing and Marinating the Beef

To ensure your beef is clean, tender, and free from any unwanted odors, here are a few tried-and-true methods for proper preparation:

  • Method 1: Soak the beef in about one cup of white wine for 15 minutes, then rinse thoroughly with clean water. This helps remove any strong smell while tenderizing the meat.

  • Method 2: Rub the beef thoroughly with coarse salt, let it sit for around 5 minutes, and then rinse off. This simple step helps cleanse the meat and enhances texture.

  • Method 3: Use roasted ginger — crush it finely and rub it over the beef. Let it sit briefly before rinsing it clean. This technique not only removes odors but also adds a subtle depth to the flavor.

spicy lemongrass dried beef

Once the beef is cleaned, place it in a strainer to drain off excess water. Then, cut the meat into medium-sized cubes. Avoid slicing too thin, as the beef will be stewed for a while, and thin pieces may fall apart during cooking.

Next, it’s time to infuse the meat with rich flavors. Marinate the beef with the following ingredients:

  • 2 tablespoons of fish sauce

  • 1 tablespoon of oyster sauce

  • 1 tablespoon of sugar

  • ½ teaspoon of MSG (optional)

  • ½ tablespoon of soy sauce

  • ½ tablespoon of garlic-infused oil

Mix everything well so the beef is evenly coated with seasoning. Let it rest for at least 15 minutes to allow the flavors to penetrate deeply, setting the stage for a delicious and aromatic spicy lemongrass dried beef dish.

Step 2: Preparing the Aromatics

Now that the beef is marinating, it’s time to prepare the essential aromatics that give this dish its signature fragrance and heat.

Start by thoroughly rinsing the lemongrass stalks under clean water to remove any dirt or debris. Shake off excess water and let them air-dry slightly. Once dry, trim the tough outer layers and finely slice the tender inner stalks. For maximum aroma release, you can either finely chop the lemongrass by hand using a sharp knife or use a food processor for faster preparation. The finer the cut, the more fragrance it will release during cooking.

spicy lemongrass dried beef

Next, rinse the chili pepper and pat it dry. Slice it into small pieces, then mince finely. If you prefer a spicier kick, keep the seeds in — or remove them for a milder version. Like the lemongrass, you can also process the chili in a blender or food processor to save time and achieve a consistent texture.

Both ingredients are key to infusing your spicy lemongrass dried beef with bold flavors, so take a little time here to get them just right.

Step 3: Simmering the Beef with Lemongrass and Chili

Now it’s time to bring all the ingredients together and let the magic happen in the pot. Begin by placing a saucepan or heavy-bottomed pot on the stove over medium heat. Add 2 tablespoons of cooking oil and wait until it’s hot. Once the oil is heated through, add half of the minced lemongrass and chili mixture. Sauté gently, stirring constantly, until the mixture becomes fragrant and slightly golden — this step is key to releasing the essential oils and infusing the oil with a rich, spicy aroma.

Next, add the marinated beef into the pot. Increase the heat to high and stir-fry quickly, allowing the beef to sear on all sides. This helps lock in the juices and deepen the flavor. Once the meat begins to firm up and brown slightly, pour in just enough water to barely cover the beef — this ensures the meat cooks evenly while maintaining a concentrated flavor. Add 1 tablespoon of soy sauce at this stage to enhance the broth’s color and taste.

spicy lemongrass dried beef

Cover the pot with a lid and bring the mixture to a boil. Once it reaches a rolling boil, reduce the heat to low and let it simmer gently for about 20 minutes. This slow simmering allows the flavors to meld and the beef to tenderize beautifully.

After 20 minutes, uncover the pot and add ½ tablespoon of sugar. Taste the broth and adjust the seasoning as needed to suit your preference — feel free to fine-tune the saltiness, sweetness, or spiciness. Finally, stir in the remaining half of the minced lemongrass and chili mixture. Cover the pot again and let it simmer for just one more minute to fully release the last burst of aroma, then turn off the heat.

Depending on how you like your dish, you can leave some broth for spooning over steamed rice, or continue simmering until the liquid reduces completely for a more intense, concentrated flavor. Either way, the result is a deeply savory, aromatic dish that pairs perfectly with warm rice or crusty bread.

Step 4: Time to Enjoy Your Spicy Lemongrass Braised Beef

Congratulations — you’ve completed the cooking process, and now it’s time to indulge in the irresistible flavors of your homemade spicy lemongrass dried beef!

As you lift the lid, you’ll be greeted by the mouthwatering aroma of lemongrass mingling with the bold, fiery scent of chili. The rich fragrance alone is enough to make your taste buds tingle in anticipation. The beef brisket has simmered to perfection — tender yet slightly chewy, beautifully infused with the deep, savory blend of spices and sauces. Every bite delivers a satisfying balance of heat, umami, and that signature citrusy zing from the lemongrass.

spicy lemongrass dried beef

This dish is best enjoyed hot, served generously over a bowl of steaming white rice. The spicy broth seeps into the grains, creating a comforting and flavorful meal that warms you from the inside out — perfect for cool days or whenever you’re craving something hearty and bold.

So, grab your chopsticks or spoon, gather your loved ones, and savor the results of your culinary effort. This is more than just a meal — it’s a flavorful experience worth sharing.

Spicy Lemongrass Braised Beef with Coconut Water

If you’re looking for a richer, more aromatic variation of the classic spicy lemongrass dried beef, this version with coconut water is a must-try. The addition of coconut water not only enhances the flavor but also gives the beef a subtle sweetness and a more velvety texture.

spicy lemongrass dried beef

Ingredients for Spicy Lemongrass Braised Beef with Coconut Water (serves 4):

  • Beef shank or brisket – 1kg (Choose well-marbled cuts for best texture and flavor)

  • Lemongrass stalks – 5 (lightly smashed and finely chopped for maximum aroma)

  • Fresh coconut water – 300ml (for a touch of natural sweetness and depth)

  • Shallots (finely minced) – 1 tablespoon (adds sweetness and aroma)

  • Garlic (finely minced) – ½ tablespoon (for a rich, savory base)

  • Soy sauce – 1 tablespoon (adds umami and depth of flavor)

  • Chinese five-spice cooking wine (Mai Que Lo) – 1 tablespoon (you may substitute with regular cooking wine or white rice wine)

  • Annatto oil – 1 tablespoon (for rich color and subtle nuttiness; optional)

  • Fish sauce – 2 tablespoons (for bold, savory undertones)

  • Sugar – 2 tablespoons (balances the heat and enhances the flavors)

  • Korean chili powder (Gochugaru) – 1½ teaspoons (adds mild heat and a smoky kick)

  • Garlic powder – 1 teaspoon (boosts the savory profile)

  • Turmeric powder – ½ teaspoon (adds warm color and earthy notes)

  • Ginger powder – ⅓ teaspoon (for a subtle, spicy warmth in the background)

This unique combination of ingredients brings out the full complexity of the dish — sweet, spicy, aromatic, and deeply savory all at once. The coconut water helps tenderize the beef while infusing it with a gentle sweetness that beautifully balances the heat from the chili and the fragrant notes of lemongrass.

Preparing Spicy Lemongrass Braised Beef with Coconut Water

Step 1: Preparing the Ingredients

Begin by thoroughly cleaning the beef shank to eliminate any unpleasant odors and impurities. You can do this by rinsing the beef with a mixture of salt and vinegar, or alternatively, with a splash of white wine or rice wine. This step not only helps deodorize the meat but also tenderizes it slightly. Once cleaned, let the beef drain in a colander until it’s completely dry, then slice it into thick, bite-sized pieces — each piece should be about 1.5cm thick to retain moisture and texture during the braising process.

Next, turn your attention to the lemongrass. Rinse it well under running water to remove any dirt, then pat dry. Slice the stalks thinly into rounds and divide them into two equal portions. One portion will be finely minced — either using a food processor or by hand with a sharp knife — to release all the essential oils and fragrance. The remaining portion should be kept as-is to infuse the dish with a more subtle, layered lemongrass aroma during the slow cooking stage.

Step 2: Marinating the Beef Shank

The next crucial step is to marinate the beef thoroughly to infuse it with layers of bold and aromatic flavors. In a large mixing bowl, combine the beef pieces with a carefully balanced blend of spices and seasonings: 1 teaspoon of garlic powder, ½ teaspoon of turmeric powder, and ⅓ teaspoon of ground ginger, which together bring warmth and depth to the meat. Add 1½ teaspoons of Korean chili powder (gochugaru) to introduce a gentle yet vibrant heat that complements the lemongrass beautifully.

For the savory elements, incorporate 2 tablespoons of fish sauce and 1 tablespoon of soy sauce, which provide a rich umami foundation. Then add 1 tablespoon of Chinese five-spice cooking wine (Mai Que Lo) to give the beef a subtle complexity and a touch of aromatic sweetness. To enhance the color and add a hint of nuttiness, mix in 1 tablespoon of annatto oil.

Balance the seasoning with 1 tablespoon of sugar to round out the flavors, along with 1 tablespoon of finely minced shallots to bring a delicate sweetness and fragrance. Thoroughly toss all the ingredients with the beef, ensuring each piece is evenly coated with the marinade. Cover the bowl and let it rest for at least 30 minutes, allowing the meat to absorb every nuance of the marinade, setting the stage for a deeply flavorful and tender braised beef dish.

Step 3: Braising the Spicy Lemongrass Beef with Coconut Water

Next, place a pot on the stove and add 2 tablespoons of cooking oil. Allow the oil to heat up until it’s shimmering, then add the minced garlic first, stirring gently to release its fragrant aroma. Shortly after, add the finely chopped lemongrass and continue sautéing until both the garlic and lemongrass turn a beautiful golden brown and fill your kitchen with an irresistible scent.

Once the aromatics are perfectly sautéed, add the marinated beef into the pot. Stir-fry the beef over high heat until the meat tightens and changes color, sealing in the flavors and juices. Then, pour in 300ml of fresh coconut water along with 200ml of cold water to create a rich, flavorful braising liquid. Season the pot with ½ teaspoon of salt and 1½ tablespoons of fish sauce, mixing well to balance the savory, sweet, and tangy notes.

As the mixture begins to boil, skim off any foam or impurities that rise to the surface; this step ensures a clear, clean broth that enhances the overall taste and presentation of the dish.

Reduce the heat to medium-low, cover the pot with a lid, and let the beef simmer gently for about 50 to 60 minutes, or until the meat becomes tender and succulent. During this time, remember to occasionally lift the lid and stir the contents to prevent the beef from sticking to the bottom of the pot, which can make cleaning difficult and affect the flavor.

Once the beef is tender, taste the broth and adjust the seasoning as needed to suit your family’s preferences. Finally, add the remaining sliced lemongrass rounds into the pot, lower the heat to a gentle simmer, and cook for an additional 5 minutes to allow the fresh lemongrass aroma to infuse fully. After this final simmer, turn off the heat and prepare to serve.

Step 4: Enjoying Your Spicy Lemongrass Beef with Coconut Water

Your delicious spicy lemongrass beef braised in coconut water is now ready to be enjoyed! For an extra touch of flavor, sprinkle some freshly ground black pepper over the dish and garnish it beautifully before serving.

The beef shank cooked with this recipe achieves a perfect balance — tender yet firm enough to hold its texture, with the connective tissue gently softened and expanded. The first bite reveals a rich, complex flavor profile: savory, aromatic, slightly sweet from the natural coconut essence, and subtly spicy that awakens your taste buds. The unmistakable scent of lemongrass adds a refreshing brightness that elevates the dish, making every mouthful more addictive than the last.

This flavorful spicy lemongrass beef pairs exceptionally well with hot steamed rice, creating a comforting and satisfying meal. Alternatively, you can enjoy it with crusty bread or a fresh baguette, which soaks up the luscious sauce beautifully. Either way, it’s guaranteed to delight your palate and warm your soul.

Tips for Choosing Fresh, Tender Beef

You should select beef cuts that have a bright red color, with visible white marbling of tendons and yellowish fat. Avoid buying beef that appears dark red, bluish, has an unpleasant odor, or shows strange white spots between the muscle fibers.

Fresh beef will have small, tender muscle fibers that are not overly fine. When you press lightly with your finger, the meat should feel firm and elastic, dry to the touch, and not sticky. On the other hand, beef that has been stored too long or is about to spoil will feel soft, mushy, and slimy when touched.

If you’re craving the irresistible taste of spicy lemongrass dried beef, look no further than Khô bò CALI — the trusted brand known for delivering premium quality and authentic flavor. Made from carefully selected beef cuts and blended with just the right amount of lemongrass and chili, Khô bò CALI offers a perfect balance of tenderness, spice, and aroma that will delight your taste buds with every bite.

Whether you want a quick snack, a flavorful addition to your meals, or a unique gift for friends and family, Khô bò CALI’s spicy lemongrass dried beef is the ideal choice. Its savory, spicy kick and tender texture make it a standout favorite that keeps customers coming back for more.

Don’t miss out! Experience the delicious harmony of spicy, fragrant lemongrass with the highest quality dried beef — order your pack of spicy lemongrass dried beef from Khô bò CALI today and enjoy the authentic taste that only genuine craftsmanship can bring.

KHÔ BÒ CALI

Address: 9511 Bolsa ave westminster CA 92683

Phone numbers: +1 (714) 452-7679 / +1 (714) 234-6899

Email: [email protected]

Website: https://khobocali.com/

How many calories does dried persimmon contain?

The Mid-Autumn Festival season also marks the time when sweet, delicious persimmons are in abundance. Among them, dried persimmon stands out with its chewy texture, delightful flavor, and eye-catching reddish-orange hue, making it a popular treat. So, how many calories are in dried persimmon? And does eating dried persimmon make you gain weight?

How many calories are in dried persimmon?

The nutritional value and calorie content of dried persimmon can vary depending on whether sugar is added during the drying process. Typically, 100 grams of natural dried persimmon contains about 100 to 130 calories. However, if additional sugar is used, the calorie content can exceed 200 calories per 100 grams.

When comparing fresh persimmons and dried persimmons in terms of calorie content, dried persimmon has more calories. This is because dried fruits have had their water content removed, making their sugar concentration—and therefore calorie content—higher. In other words, the higher the calorie content of the fresh fruit, the higher the calorie content of its dried version.

dried persimmon

Dried persimmon is also considered a nutritious food. Specifically, 100 grams of dried persimmon contains approximately:

  • Protein: 1.5 – 2.3g

  • Fructose: 69.5 – 73.3g

  • Fat: 0.4 – 0.5g

  • Calcium: 84 – 163mg

  • Phosphorus: 50 – 90mg

  • Carotene: 1.09 – 4.31mg

In addition, it provides other essential nutrients such as magnesium, thiamine, ascorbic acid (vitamin C), and various other beneficial compounds.

Health Benefits of Dried Persimmon

According to traditional Eastern medicine, persimmons are sweet, slightly astringent, and cool in nature. They are believed to help clear heat and dryness, moisten the lungs, reduce phlegm, soften hard masses, quench thirst, strengthen the spleen, treat dysentery, and stop bleeding. As reported by Sina, consuming dried persimmon can offer the following health benefits:

dried persimmon

  • Clears heat and soothes cough

Fresh persimmons are known to help clear heat and relieve coughing. When turned into dried persimmon, the fruit develops a white powdery coating on the outside that is especially effective in reducing phlegm, treating mouth ulcers, dry throat, and inflammation in the throat.

This white coating is a probiotic formed from the fruit’s natural sugars—glucose and fructose. It helps protect the persimmon and breaks down residual tannins, eliminating the astringent taste.

  • Prevents constipation and hemorrhoids

Dried persimmon is also beneficial for the digestive system, as it helps stimulate bowel movements and flush out toxins, effectively relieving symptoms like constipation and hemorrhoids. This benefit comes from its high fiber content and natural pectin, which enhance intestinal motility.

  • Helps stop bleeding

Boiling dried persimmon with honey is said to aid in stopping bleeding and treating various hemorrhagic conditions such as rectal bleeding, bleeding hemorrhoids, coughing up blood, or vomiting blood. However, this remedy should only be used under the guidance of a qualified medical professional and should not be self-prescribed.

  • Anti-inflammatory properties

In addition to vitamin C, dried persimmon is rich in antioxidants like thiamine and catechins, which have powerful anti-inflammatory effects. These compounds help the body combat oxidative damage caused by free radicals.

  • Supports healthy blood pressure

Both fresh and dried persimmon contain potassium, which is associated with improved blood pressure regulation. Potassium also supports cardiovascular health, lowers cholesterol, and enhances muscle and nerve function.

  • Beneficial for thyroid patients

According to Sina, dried persimmon contains a high level of iodine, making it beneficial for individuals with goiter or iodine deficiency-related thyroid conditions.

Note: If you are undergoing medical treatment, always consult your doctor before consuming dried persimmon for health purposes. Never stop taking prescribed medication or replace it with folk remedies without a doctor’s approval. The benefits mentioned above are for reference only and may vary from person to person.

4. How to Make Dried Persimmon at Home

dried persimmon

Besides buying persimmons from reputable sources, you can also make dried persimmon at home to ensure hygiene and quality. Here is a simple method you can follow:

  • Step 1: Choose persimmons

Selecting good-quality persimmons helps ensure your dried persimmons are sweet, fragrant, and have an attractive shape. Choose ripe persimmons to reduce astringency, with smooth, shiny skin, and firm to the touch. Avoid bruised persimmons or those without stems.

Fresh persimmons with plump, non-indented stems are the tastiest. The stem should be fresh green, not yellowish, since yellow stems indicate the persimmon was picked a long time ago and is no longer fresh.

  • Step 2: Prepare and clean

  • First, carefully peel the persimmons, ensuring no skin is left as leftover peel can taste bitter. Handle gently to avoid bruising. Leave the stems intact for better preservation and appearance.

  • After peeling, prepare a pot of boiling water mixed with 2–3 cups of white wine to sterilize the persimmons and prevent bacteria or insects during drying or storage. Dip the persimmons into this hot wine water for 2–3 minutes, then place them stem-side up to drain.

  • Step 3: Dry the persimmons

For dried persimmon, use a dehydrator set to 60–70°C (140–158°F) and dry for about 6–10 hours until the persimmons become chewy. For a drier texture, extend the drying time.

For air-dried or sun-dried persimmons, thread them onto a string and hang in a well-ventilated area for about 7–10 days.

  • Step 4: Massage and finalize

After drying for 2–3 hours (in a dehydrator) or 7–10 days (air drying), gently massage the persimmons every 2 days to help release their sweetness evenly.

The final dried persimmon product is ready after 10–15 days, with a dry exterior but soft, chewy inside. You may notice a white powdery coating forming on the surface—this is normal. Store dried persimmons in the refrigerator to keep them fresh longer.

If you’re looking for delicious, high-quality, and hygienically prepared dried persimmon, don’t miss out on Khô Bò CALI’s Dried Persimmon! Carefully selected from ripe, juicy persimmons and processed with modern drying techniques, our product retains the natural sweet flavor and the attractive characteristic white powder coating.

Khô Bò CALI’s dried persimmons are not only tasty but also rich in nutrients, offering many wonderful health benefits. They make an ideal snack for every household—delicious, convenient, and long-lasting.

Order Khô Bò CALI’s Dried Persimmon today to experience the rich, sweet taste and enjoy the natural health benefits. Click [here] to order now or contact us for detailed advice!

KHÔ BÒ CALI

Address: 9511 Bolsa ave westminster CA 92683

Phone numbers: +1 (714) 452-7679 / +1 (714) 234-6899

Email: [email protected]

Website: https://khobocali.com/

Vì sao hạt sen Huế được ưa chuộng? Bí quyết chọn mua đúng chuẩn

Nhắc đến ẩm thực cố đô, người ta không thể không nhớ đến hạt sen Huế, thứ đặc sản mang trong mình hương vị thanh tao, tinh túy của vùng đất kinh kỳ. Dù ngày nay hạt sen xuất hiện ở nhiều nơi trên khắp cả nước, nhưng hạt sen xứ Huế vẫn giữ được nét riêng biệt khó lẫn. Vậy làm sao để phân biệt đúng hạt sen Huế chính gốc? Hãy cùng Khô bò CALI khám phá những đặc điểm đặc trưng giúp bạn dễ dàng nhận biết loại hạt sen nổi tiếng này nhé!

Hạt sen Huế là gì?

Nếu có dịp đặt chân đến cố đô Huế vào độ tháng 4 đến tháng 9, mùa sen nở rộ nhất trong năm, bạn sẽ không khỏi ngỡ ngàng trước khung cảnh nên thơ và mùi hương ngọt ngào dịu nhẹ lan tỏa trong không khí. Những con đường nhỏ rợp bóng cây bỗng trở nên đầy thi vị với sắc hồng sen xen lẫn màu xanh mướt mắt, cùng hương thơm thanh tao tỏa ra từ những mẹt sen tươi mà các cô gánh hàng rong bày bán bên đường. Không ồn ào, không phô trương, sen Huế cứ nhẹ nhàng đi vào lòng người như chính cái vẻ trầm mặc, sâu lắng của mảnh đất cố đô.

hạt sen Huế

Ẩn sâu trong từng bông sen ấy là hạt sen, phần tinh túy nhất được chắt lọc từ thiên nhiên và bàn tay con người. Hạt sen Huế còn là niềm tự hào được gìn giữ qua nhiều thế hệ, một thức quà mộc mạc mà sâu sắc, đậm đà hồn cốt xứ Kinh kỳ.

Cách nhận biết hạt sen Huế chính gốc

Trong vô vàn loại hạt sen được bày bán trên thị trường hiện nay, hạt sen Huế vẫn giữ vững vị thế riêng nhờ vào những đặc điểm nhận diện rất dễ nhận biết nếu bạn tinh ý.

hạt sen Huế

Để phân biệt đúng loại hạt sen chính gốc xứ Huế, bạn có thể dựa vào những dấu hiệu sau:

  • Màu sắc: Hạt sen Huế thường có màu trắng ngà đến trắng đục nhẹ, không quá trắng sáng nhân tạo. Màu sắc của hạt mang vẻ tự nhiên, đồng đều và không bị lẫn tạp chất hay đốm đen. Khi nhìn kỹ, bạn sẽ thấy lớp vỏ mỏng của hạt giữ được nét mộc mạc đặc trưng, không qua xử lý tẩy trắng.

  • Mùi hương: Một trong những điểm đặc biệt giúp hạt sen Huế “ghi điểm” với người sành ăn chính là hương thơm thoang thoảng, thanh dịu rất riêng biệt. Ngay cả khi chưa chế biến, hạt đã tỏa ra mùi thơm nhẹ nhàng của sen tươi – điều mà không phải loại hạt sen nào cũng có được.

  • Kích thước và hình dáng: Hạt sen Huế nổi bật với kích thước đồng đều, tròn đầy, trăm hạt như một. Bề mặt hạt mịn, không bị nứt vỡ, nhân sen nằm chính giữa hạt và dễ dàng rút tim nếu cần.

  • Chất lượng khi chế biến: Khi nấu chín, hạt sen Huế có độ bở vừa phải, nghĩa là bở nhưng không nát, giữ nguyên được hình dáng hạt sau khi nấu. Đặc biệt, nếu nghiền nhẹ bằng tay, bạn sẽ cảm nhận được độ dẻo, bùi và mịn của hạt, một yếu tố khẳng định chất lượng vượt trội của loại đặc sản này.

Nhờ những đặc điểm độc đáo trên, hạt sen Huế không chỉ là nguyên liệu được ưa chuộng trong các món ăn truyền thống mà còn là biểu tượng cho sự tinh tế trong văn hóa ẩm thực đất cố đô.

Công dụng tuyệt vời của hạt sen Huế đối với sức khỏe

Không chỉ đơn thuần là một đặc sản gắn liền với vùng đất cố đô, hạt sen Huế còn được trân quý như một “vị thuốc quý” mà thiên nhiên đã ưu ái ban tặng cho con người. Từ lâu, trong kho tàng ẩm thực và y học dân gian Việt Nam, hạt sen đã được ghi nhận bởi những công dụng tuyệt vời đối với sức khỏe, vừa có giá trị dinh dưỡng cao, vừa mang tính dược liệu tự nhiên. Với vị ngọt thanh, tính bình và dễ chế biến, hạt sen Huế có thể dùng để nấu nhiều món ngon như chè hạt sen, cháo hạt sen, canh hầm bồi bổ, mứt sen dẻo thơm hay đơn giản là luộc chín để ăn trực tiếp, tất cả đều giữ trọn hương vị tinh tế và thanh khiết.

hạt sen Huế

Đặc biệt, hạt sen Huế rất phù hợp với những người có thể trạng yếu, vừa trải qua thời kỳ ốm đau hay suy nhược cơ thể. Việc sử dụng đều đặn hạt sen trong khẩu phần ăn sẽ giúp bồi dưỡng sức khỏe từ bên trong, hỗ trợ tiêu hóa, nâng cao đề kháng và mang lại nguồn năng lượng dồi dào cho cơ thể. Bên cạnh đó, hạt sen còn được biết đến với công dụng an thần, cải thiện giấc ngủ, giảm triệu chứng mất ngủ kéo dài, đau đầu, hoa mắt và giúp ổn định huyết áp. Đây chính là lựa chọn lý tưởng cho người cao tuổi, người làm việc trí óc căng thẳng hoặc những ai đang cần tìm lại sự cân bằng trong cuộc sống hiện đại bộn bề.

Không quá cầu kỳ hay đắt đỏ, hạt sen Huế mang trong mình giá trị giản dị mà sâu sắc là sự giao hòa giữa dinh dưỡng, sức khỏe và văn hóa ẩm thực lâu đời của vùng đất kinh kỳ.

Readmore: Khám phá ngay cách làm kẹo mè đen giòn ngon khó cưỡng

Cách bảo quản hạt sen đúng cách để giữ trọn hương vị và dưỡng chất

Hạt sen là loại thực phẩm bổ dưỡng nhưng cũng rất dễ bị hư hỏng nếu không được bảo quản đúng cách. Tùy vào từng loại hạt sen còn vỏ hay đã bóc vỏ mà bạn cần áp dụng phương pháp bảo quản phù hợp để giữ được độ tươi ngon, dẻo bùi đặc trưng và giá trị dinh dưỡng vốn có của hạt sen Huế.

hạt sen Huế

Đối với hạt sen tươi còn vỏ xanh:
Khi vừa mua về, bạn nên tiến hành sơ chế ngay để bảo quản được lâu hơn. Đầu tiên, nhẹ nhàng tách lớp vỏ xanh bên ngoài, dùng tăm hoặc que nhỏ lấy tim sen – phần có vị đắng nằm giữa hạt. Sau khi đã lấy hết tim sen, bạn trải đều hạt sen ra mâm hoặc khay rồi mang đi phơi nắng trong vài ngày cho đến khi hạt khô hoàn toàn. Lưu ý quan trọng là không nên rửa hạt sen bằng nước trong suốt quá trình phơi để tránh làm hạt bị ẩm, dễ mốc và giảm chất lượng. Khi hạt đã khô, bạn cho vào lọ thủy tinh hoặc hũ kín, đậy nắp cẩn thận và để nơi khô ráo, thoáng mát, tránh ánh nắng trực tiếp hoặc nơi ẩm thấp để đảm bảo hạt không bị hỏng.

Đối với hạt sen đã bóc vỏ sẵn:
Loại này thường được sơ chế sẵn và tiện lợi hơn khi sử dụng. Bạn chỉ cần lấy tim sen bằng tăm nếu hạt còn nguyên tim, sau đó chia nhỏ thành từng phần đủ dùng cho mỗi lần nấu. Bạn có thể gói chúng vào giấy sạch hoặc túi nilon, buộc kín và bảo quản trong ngăn mát tủ lạnh nếu sử dụng trong vài ngày. Với mục đích sử dụng lâu dài, bạn nên cho hạt sen vào hộp kín rồi bảo quản trong ngăn đá, cách này sẽ giúp hạt giữ được độ tươi và vị ngon bùi trong nhiều tuần đến vài tháng.

Dù ở dạng nào, việc bảo quản đúng cách không chỉ giúp bạn tận dụng được tối đa giá trị dinh dưỡng từ hạt sen Huế, mà còn giữ được hương thơm tự nhiên đặc trưng, điều làm nên sự khác biệt của đặc sản cố đô này so với các loại hạt sen thông thường.

Những món ngon nức tiếng từ hạt sen Huế 

Mang trong mình hương vị thanh tao, dẻo bùi đặc trưng không thể trộn lẫn, hạt sen Huế từ lâu đã trở thành nguyên liệu quý giá trong kho tàng ẩm thực dân gian lẫn cung đình Huế. Nhờ độ thơm ngon, bổ dưỡng, hạt sen Huế được ưu ái góp mặt trong vô số món ăn, từ món ngọt đến món mặn, từ món ăn thường nhật đến đặc sản đãi khách. Dưới đây là những món ngon tiêu biểu mà bất kỳ ai yêu ẩm thực Huế cũng nên một lần thưởng thức:

Chè dưỡng nhan 

Chè dưỡng nhan không chỉ là món ăn giải nhiệt, mà còn được xem là “thần dược” cho làn da và sức khỏe tổng thể. Với sự kết hợp giữa hạt sen Huế bùi béo, tuyết yến, nhựa đào, táo đỏ, long nhãn, tuyết liên tử, lá dứa… món chè mang đến vị ngọt thanh tao, hương thơm nhẹ nhàng cùng kết cấu đa tầng từ các nguyên liệu quý. Không chỉ ngon miệng, món chè này còn giúp thanh lọc cơ thể, bổ máu, làm đẹp da, một lựa chọn hoàn hảo cho những ai đang chăm sóc sức khỏe từ bên trong.

Súp hạt sen 

Súp hạt sen là món ăn vừa nhẹ nhàng, dễ tiêu hóa, vừa đẹp mắt với sắc màu tươi tắn từ nấm, bắp, bí đỏ và các loại rau củ. Khi được ninh mềm cùng hạt sen Huế, món súp mang đến vị ngọt dịu tự nhiên, phù hợp cho cả người lớn tuổi lẫn trẻ nhỏ. Vào những ngày nắng nóng, một bát súp hạt sen thanh mát chính là món ăn lý tưởng giúp giải nhiệt và nạp lại năng lượng.

Canh sườn hầm hạt sen 

Canh sườn hầm hạt sen là sự hòa quyện tuyệt vời giữa nước dùng ngọt thanh từ xương và vị bùi béo từ hạt sen Huế. Món canh này không chỉ thơm ngon mà còn vô cùng bổ dưỡng, đặc biệt phù hợp cho người mới ốm dậy hoặc cần bồi bổ sức khỏe. Để món canh đạt đến độ hoàn hảo, bạn nên hầm kỹ trong thời gian dài để hạt sen mềm nhừ, tan nhẹ trong miệng mà vẫn giữ được vị ngọt tự nhiên.

Chè hạt sen 

Nhắc đến hạt sen Huế, không thể không kể đến món chè hạt sen truyền thống. Đơn giản nhưng tinh tế, món chè này là sự kết hợp của hạt sen bùi bở và nước đường phèn thanh mát. Vào mùa hè, chỉ cần một bát chè hạt sen mát lạnh cũng đủ xua tan cái nóng oi ả và mang lại cảm giác thư thái, dễ chịu.

Xôi hạt sen 

Xôi hạt sen là món ăn quen thuộc trong các dịp lễ Tết hoặc cúng giỗ của người dân Huế. Gạo nếp dẻo thơm quyện cùng hạt sen Huế bùi ngọt không chỉ tạo nên hương vị hấp dẫn mà còn gợi nhớ đến sự trang trọng, thiêng liêng trong văn hóa ẩm thực cổ truyền. Món xôi thường được dùng để đãi khách quý hoặc làm lễ vật cúng tổ tiên.

Cơm hấp lá sen

Cơm hấp lá sen là một món ăn mang đậm phong vị cung đình, tinh tế từ hình thức đến hương vị. Cơm trắng được trộn cùng các loại rau củ, hạt sen, đậu xanh, nấm hương, rồi gói gọn trong lá sen tươi và hấp chín. Khi mở lớp lá sen, hương thơm thoảng nhẹ lan tỏa hòa quyện cùng vị bùi ngọt của hạt sen Huế, tạo nên món ăn vừa thanh đạm vừa đầy dưỡng chất, thích hợp cho những ai yêu thích sự nhẹ nhàng, thanh tao trong từng bữa ăn.

Nếu bạn đang tìm kiếm một sản phẩm hạt sen Huế chất lượng, thơm ngon đúng chuẩn cố đô thì không thể bỏ qua Hạt Sen Huế Dẻo Bùi của Khô bò CALI. Được tuyển chọn kỹ lưỡng từ những hạt sen tươi nguyên chất, trải qua quy trình chế biến hiện đại nhưng vẫn giữ trọn vẹn hương vị truyền thống, sản phẩm mang đến trải nghiệm thơm ngon, bùi béo đặc trưng, mềm dẻo tự nhiên khó quên.

hạt sen Huế

Hạt Sen Huế Dẻo Bùi Khô bò CALI không chỉ là nguyên liệu tuyệt vời cho các món chè, súp, canh hay xôi mà còn là món quà ý nghĩa dành tặng người thân, bạn bè. Với bao bì sang trọng, tiện lợi và bảo quản tốt, đây chắc chắn sẽ là sự lựa chọn hàng đầu cho những ai yêu thích hạt sen Huế chính gốc mà vẫn muốn tiện lợi trong sử dụng.

Đặt mua ngay hôm nay tại cửa hàng Khô bò CALI để tận hưởng vị ngon tinh túy từ hạt sen cố đô, đồng thời được tư vấn nhiệt tình về cách bảo quản và chế biến để mỗi bữa ăn đều trở thành một trải nghiệm đậm đà, trọn vẹn hương vị Huế.

📞 Gọi ngay: +1 (714) 452-7679 / +1 (714) 234-6899
💬 Inbox fanpage Khô Bò CALI để được tư vấn nhanh nhất!

[Guide] How to Buy Lotus Seeds and Cook Fresh Lotus Seeds

Lotus seeds are a versatile food that can be eaten raw or cooked. Dried lotus seeds can be prepared like popcorn and enjoyed as a snack. They are harvested in August and September, then sun-dried. There are two main types of lotus seeds: those with white shells and those with brown shells. The shell, membrane, and bitter germ of the white lotus seeds are removed during harvesting. The brown lotus seeds retain their shell and membrane, which develop as the seeds reach full maturity. If you’re looking to buy lotus seeds, understanding these types can help you choose the right one for your needs.

Understanding Lotus Seeds

The Origin of Lotus Seeds

The lotus is an aquatic, herbaceous flowering plant. Its flowers come in a variety of colors, ranging from pure white to red, light pink, yellow, purple, and even blue. The lotus is one of the few plant species that can regulate the temperature of its flowers, maintaining it within an optimal range to attract insects for pollination. Lotus seeds are found inside the seed pod of the lotus flower. After the flower withers and the petals fall, only the small pod remains. This pod, shaped like a showerhead, contains numerous lotus seeds.

Lotus seeds are a versatile food that can be consumed either raw or cooked. Dried lotus seeds can even be prepared like popcorn. They are typically harvested in August and September and then sun-dried. There are two main types of lotus seeds: those with white shells and those with brown shells. The shell, membrane, and bitter germ of the white lotus seed are removed during the harvesting process. The brown-shelled lotus seeds retain their outer membrane, which forms as the seed matures.

Buy Lotus Seeds

Dried lotus seeds are widely sold in Asian markets. These seeds usually have a hard and coarse texture, so it is recommended to soak them overnight before cooking. They are commonly added to dishes like soups. Fresh lotus seeds are sold with the green embryo still intact. Therefore, before cooking, it is necessary to peel off the shell and remove the green germ in the center.

Apart from the seeds, every part of the lotus plant is edible and serves various purposes. Lotus stems are often used in salads, while the stalks are commonly cooked as vegetables in soups, stir-fries, or stews. The large leaves are ideal for wrapping sticky foods like rice, as they do not cling to the food. Dried lotus leaves are also used to make lotus leaf tea, which is popular for weight loss. Young leaves can be used like regular vegetables.

The beautiful and pure lotus flowers are often used for decoration in homes or placed in sacred spaces such as temples. The petiole (leaf stalk) is also edible, and its fibers are used to make wicks for oil lamps and even to weave fabric. Textiles made from lotus fibers are believed to have healing properties.

And finally, the lotus seed—the star of this article—needs no further introduction. It can be used in an impressive variety of both savory and sweet dishes, such as lotus seed stewed with pigeon, lotus seed sweet soup, and lotus seed milk. If you’re planning to buy lotus seeds, knowing how they are harvested and used will help you better appreciate their culinary and cultural value.

Types of Lotus Seeds on the Market

You may wonder—if lotus can be grown anywhere, wouldn’t all lotus seeds be essentially the same? So how exactly are lotus seeds classified? I divide them into two main categories based on: harvesting methods and how they are used by consumers.

Based on the harvesting method, lotus seeds are classified into brown lotus seeds and white lotus seeds. Brown lotus seeds are harvested when the lotus pod has wilted or is nearly dry, so the silk-like membrane sticks to the seed, giving it a brown color. The germ (or heart) of a brown lotus seed can only be removed by splitting the seed in half. On the other hand, white lotus seeds are harvested from green lotus pods that still contain nearly mature seeds inside. These seeds can be peeled, the outer silk removed, and the green germ extracted using a toothpick or pointed tool.

Additionally, lotus seeds are commonly divided into fresh lotus seeds and dried lotus seeds on the market. Fresh lotus seeds are usually dried to reduce their moisture content to below 10% for easier preservation and transportation. Depending on the processing method, the form in which they reach consumers may vary. However, both types retain the same nutritional content and health benefits that are naturally present in lotus seeds.

If you’re planning to buy lotus seeds, understanding these classifications can help you choose the right type for your culinary or health needs.

Benefits of Fresh Lotus Seeds

Nutritional Value of Fresh Lotus Seeds

Lotus seeds, also known as lotus nuts, have a sweet taste and neutral nature, and they contain many valuable nutrients. In traditional Eastern medicine, lotus seeds are considered a delicious and nutritious food as well as a precious medicinal ingredient that calms the mind, nourishes the kidneys, strengthens the spleen, and can improve negative conditions such as diarrhea, insomnia, indigestion, bloating, poor appetite, and thirst caused by high fever or dehydration.

Buy Lotus Seeds

According to the USDA, in 100 grams of dried lotus seeds, there are:

  • Calories: 332 kcal

  • Protein: 15.41 g

  • Carbohydrates: 64.47 g

  • Fat: 1.97 g

  • Potassium: 1368 mg

  • Calcium: 163 mg

  • Phosphorus: 626 mg

  • Magnesium: 210 mg

  • Iron: 3.53 mg

  • Vitamin B3 (Niacin): 1.60 mg

  • Vitamin B5 (Pantothenic acid): 0.851 mg

  • Vitamin B6: 0.629 mg
    Along with other minerals and vitamins such as vitamin A, vitamin B1, copper, manganese, and zinc.

Given these nutrients, it’s no surprise that lotus seeds are widely used in daily life as a valuable health food, rich in energy, protein, minerals, and vitamins in balanced amounts.

Moreover, lotus seeds contain an enzyme called L-isoaspartyl methyltransferase, which has anti-aging properties by repairing damaged proteins in the body. Eating lotus seeds benefits the skin by helping restore vitality and rejuvenate the skin. They are also rich in kaempferol, a natural flavonoid with many benefits, including anti-inflammatory effects. This flavonoid is especially effective in reducing inflammation of the gums, particularly in the elderly. To better understand the many benefits that fresh lotus seeds bring, please continue reading this article.

Benefits of Eating Fresh Lotus Seeds

  • Improves Sleep
    Lotus seeds help improve insomnia. It’s well-known in Eastern medicine that lotus seeds act as a sedative. Nutrition experts say lotus seeds contain alkaloids and aromatic glucosides that promote calmness. Eating lotus seeds stimulates insulin secretion from the pancreas, making it easier to fall asleep and improving sleep quality. They also relieve stress and reduce anxiety effectively.

  • Oral Care
    Common oral issues include bleeding gums, mouth ulcers, and canker sores. By adding lotus seeds to your diet, you can reduce these problems and soothe gum irritation caused by improper oral hygiene, thanks to natural anti-inflammatory compounds like kaempferol and flavonoids found in lotus seeds.

  • Helps Stabilize Blood Pressure
    Alkaloids with antispasmodic properties and isoquinoline compounds in the lotus seed heart help dilate blood vessels and lower blood pressure. Including lotus seeds in your diet can help manage high blood pressure.

  • Strong Antioxidant Effects
    Lotus seeds contain antioxidants that help fight inflammation and infection. For decades, traditional Chinese medicine has used lotus seeds to heal wounds and prevent infection spread. The rich kaempferol flavonoid in lotus seeds has anti-inflammatory properties and can treat mouth pain and ulcers effectively. Lotus seeds have long been recognized for their soothing and antibacterial effects.

  • Supports Weight Loss
    Nutritionists highlight lotus seeds as a natural appetite suppressant. So, does eating lotus seeds help with weight loss? Yes, it does. Lotus seeds are known as a “golden food” for health and effective weight management. Besides low calories, lotus seeds are rich in protein, potassium, phosphorus, and magnesium—nutrients that act as enzyme catalysts and cellular components to help you feel full faster and speed up fat burning, especially belly fat. Moreover, lotus seeds contain very low saturated fat, cholesterol, and sodium—factors that contribute to obesity and related health problems.

Some suitable lotus seed dishes for weight loss include:

  • Lotus seed and red date sweet soup

  • Lotus seed and longan sweet soup

  • Lotus seed and papaya sweet soup

  • Lotus seed milk

  • Brown rice porridge with lotus seeds

  • Beauty Benefits
    Seeds, in general, provide energy to promote collagen production and restore essential proteins to maintain youthful skin. Lotus seeds contain a special enzyme, L-isoaspartyl methyltransferase, which repairs damaged proteins in the human body, helping keep the skin young. Additionally, their anti-inflammatory properties reduce excess oil, unclog pores, and prevent acne formation. Eating lotus seeds is an effective way to maintain smooth and radiant skin. Their carbohydrates, lipids, calcium, phosphorus, and vitamins also help exfoliate dead skin cells and improve blood circulation for brighter, smoother skin.

  • Nourishing for Pregnant Women and Children
    For pregnant women, lotus seeds play an important role by providing essential nutrients such as protein, lipids, carbohydrates, calcium, phosphorus, iron, and vitamins B1, B2, PP, and C. Lotus seeds are also a good protein source that supports fetal nervous system and brain development. Obstetricians recommend lotus seeds for pregnant women to promote a healthy pregnancy because of their rich energy and abundant vitamins and minerals. The carbohydrate, protein, and various vitamins like A and C in lotus seeds help stabilize pregnancy, prevent miscarriage, and stimulate fetal brain development for comprehensive growth.

Readmore: How to make soft, delicious, and chewy candy with sesame seeds that won’t harden – perfect for sweet tooth lovers.

Important Notes When Consuming Fresh Lotus Seeds

Although fresh lotus seeds are known as a very easy-to-eat food for almost everyone, there are a few important points you should keep in mind when consuming them:

Recommended daily amount:
For children, it is advisable to give them about 1 to 2 grams per day, which can be ground into a fine powder or cooked into porridge. While lotus seeds offer many health benefits, eating too many can cause some unwanted side effects such as constipation, bloating, and indigestion.

For adults, it is recommended to consume only about 28 grams of lotus seeds per day. Eating too many lotus seeds, especially those containing lotus embryos (the green core), can cause fatigue and irregular heartbeats. Nutrition experts also advise not to eat large amounts continuously for a long time or for more than 7 days to avoid undesirable side effects. After a few days of consumption, take a break to allow the body to process and eliminate before resuming.

Buy Lotus Seeds

People who should limit fresh lotus seed intake:
Lotus seeds are generally safe and non-toxic but should be limited if you have conditions like constipation, indigestion, or bloating. Although lotus seeds support digestive function, they should only be used when suffering from diarrhea or stomach pain. Continuous absorption of the vitamins and minerals in lotus seeds can overload the system and worsen bloating.

Note on lotus embryos (the green core) in fresh lotus seeds:
The lotus embryo is known as the main ingredient to treat insomnia and difficulty sleeping and is often used in sedative medicines. However, lotus embryos are quite bitter and hard to eat, so they are usually removed to improve the taste of dishes. If you want to use lotus embryos for sleep support or sedation, you should only consume processed lotus embryos. Eating too many fresh lotus embryos at once can be toxic. When combined with medicinal herbs, they should be roasted (dry-fried) before use in a controlled amount.

Heart disease patients should be cautious:
People with heart conditions should avoid eating lotus embryos together with lotus seeds or should limit the quantity. Lotus embryos contain a high amount of alkaloids that can affect the heart and may cause heart pain or stroke if consumed excessively.

Lotus seeds are a rich source of essential nutrients for the body. However, it is important to consume them with care to maintain an effective and safe intake. Eat lotus seeds in moderation, avoid excessive consumption, and combine them in meals to enhance flavor.

Buying Fresh Lotus Seeds

Price of Fresh Lotus Seeds

On the market, lotus seeds are sold in many places. You can easily find them at local markets, supermarkets, or food stores. However, the most important thing is to choose a reputable seller. Fresh lotus seeds are typically sold at around 180,000 VND per kilogram and can go up to 200,000 VND per kilogram. Despite the price, many homemakers are still willing to buy them due to their outstanding health benefits. As for dried lotus seeds, prices vary depending on the brand and added ingredients, usually ranging from 300,000 to over 400,000 VND per kilogram (estimated prices).

Tips for Choosing Fresh Lotus Seeds

Buy directly from lotus ponds:

It’s best to purchase lotus seeds right after they’ve been harvested. At this time, the seeds are still inside the seed pod, allowing you to freely select the best and freshest ones. Alternatively, you can buy from small vendors at local markets. However, buying directly from the lotus pond is usually much cheaper since you’re buying at the original price. Typically, unpeeled lotus seeds cost around 60,000 VND/kg, while peeled seeds cost about twice as much, around 120,000 VND/kg. Fresh lotus seeds that have had the bitter green core (lotus embryo) removed are usually sold for around 160,000 VND/kg.

Buy unpeeled fresh lotus seeds:

To maintain the freshness and flavor, it’s recommended to buy lotus seeds that are still in their shells. Once purchased, you can sun-dry the seeds and avoid letting them get wet. Once dry, store them in a sealed jar for longer preservation. Here’s a tip to peel the seeds and remove the embryo at home using just a toothpick: First, make a small cut on the seed with the toothpick. Then, break off the sharp end of the toothpick and use the blunt end to push through the seed from the opposite side of the cut, following the vertical direction. The lotus embryo will be pushed out through the opening without damaging the seed’s shape.

Buy Lotus Seeds

Choose mature lotus seeds:

When buying fresh lotus seeds, choose mature ones. Avoid young or underdeveloped seeds. Mature seeds are usually plump, with an ivory white or deep yellowish color. These seeds, when cooked, release a distinctive aroma and have a delicious, tender texture without being tough.

Choose lotus seeds that still contain the embryo:

As we know, a lotus seed consists of two parts: the seed and the embryo (a small green shoot inside). This embryo has calming properties and is used to treat insomnia, nervous exhaustion, and sleep disorders. When you buy lotus seeds that still contain the embryo, you can use the seeds for cooking and the embryos for making tea, which is great for your health. Lotus embryo tea helps cool the body, calm the mind, and lower blood pressure.

I would also like to emphasize that if you have the chance to visit a lotus pond, take the opportunity to buy fresh lotus seeds on the spot, as they will be of the highest quality and flavor. Especially when used in stews or sweet soups, they offer a rich, nutty taste and soft texture without being chewy. Lotus seeds are a prized food in Vietnam, known for their nutritional value and long-standing popularity. However, not everyone knows how to choose high-quality fresh lotus seeds. I hope that with these helpful tips, you’ll be able to select the best lotus seeds for your family.

Looking for a delicious and ready-to-eat lotus seed product?

If you don’t have time to prepare fresh lotus seeds yourself, why not try Khô Bò CALI’s Premium Lotus Seed Jam? Made from carefully selected mature lotus seeds, our jam is slow-cooked with just the right amount of sweetness to preserve both flavor and nutrients. Each bite is soft, fragrant, and melts in your mouth — perfect for family gatherings, gifts, or simply enjoying with a cup of tea.

Khô Bò CALI is proud to offer high-quality, handmade lotus seed jam with no preservatives or artificial coloring — just the natural goodness of real ingredients.

👉 Order now via our website or message us on Facebook to enjoy the true taste of Vietnam’s traditional sweets, crafted with care by Khô Bò CALI.

KHÔ BÒ CALI

Address: 9511 Bolsa ave westminster CA 92683

Phone numbers: +1 (714) 452-7679 / +1 (714) 234-6899

Email: [email protected]

Website: https://khobocali.com/

Khám phá ngay cách làm kẹo mè đen giòn ngon khó cưỡng

Tết đến là lúc chúng ta tìm về hương vị truyền thống, nơi mỗi món ăn đều mang theo câu chuyện của tuổi thơ và sự gắn kết gia đình. Trong vô vàn món ngon ngày Tết, kẹo mè đen không chỉ hấp dẫn bởi vị bùi béo, giòn rụm, mà còn bởi sự mộc mạc, gần gũi gói trọn trong từng thanh kẹo nhỏ. Nếu bạn đang muốn tự tay chuẩn bị món kẹo này để đãi khách hoặc làm quà biếu, hãy cùng khám phá cách làm kẹo mè đen thơm ngon, giòn tan tại nhà – vừa đơn giản, vừa trọn vẹn hương vị truyền thống.

Lợi ích dinh dưỡng tuyệt vời ẩn chứa trong từng thanh kẹo mè đen

Không chỉ là một món ăn vặt truyền thống hấp dẫn, kẹo mè đen còn là nguồn cung cấp dinh dưỡng dồi dào cho sức khỏe. Thành phần chính – mè đen (hay còn gọi là vừng đen) – từ lâu đã được biết đến là thực phẩm quý với hàm lượng cao các vitamin A, B1 cùng nhiều khoáng chất thiết yếu như sắt, canxi, magie… Những dưỡng chất này không chỉ giúp tăng cường sức đề kháng mà còn có tác dụng hỗ trợ phòng ngừa ung thư, ổn định huyết áp, bảo vệ tim mạch và cải thiện chức năng tiêu hóa.

Không dừng lại ở đó, trong một số công thức cách làm kẹo mè đen hiện đại, người ta còn bổ sung thêm hạt điều và hạt óc chó – hai loại hạt nổi tiếng với khả năng cải thiện hoạt động não bộ, tăng chất lượng giấc ngủ và hỗ trợ phòng chống các bệnh lý nguy hiểm nhờ chứa nhiều chất béo tốt, vitamin và chất chống oxy hóa mạnh mẽ.

Sự kết hợp tinh tế giữa các nguyên liệu truyền thống như đường, mạch nha cùng các loại hạt bổ dưỡng đã tạo nên món kẹo mè đen không chỉ ngon miệng mà còn mang đến giá trị sức khỏe vượt trội – một món quà vừa ngon vừa lành cho những ngày đầu xuân.

Chuẩn bị nguyên liệu – Bước đầu tiên để tạo nên món kẹo mè đen thơm ngon, giòn rụm

Để làm ra những thanh kẹo mè đen vừa bùi, vừa giòn lại ngọt thanh hấp dẫn, khâu chuẩn bị nguyên liệu đóng vai trò vô cùng quan trọng. Công thức dưới đây sẽ giúp bạn làm ra khoảng 15 chiếc kẹo mè đen – đủ để cả gia đình 2 đến 3 người cùng thưởng thức trong dịp Tết hoặc dùng làm món quà nhỏ đầy ý nghĩa. Dĩ nhiên, bạn hoàn toàn có thể điều chỉnh lượng nguyên liệu linh hoạt sao cho phù hợp với số lượng người ăn hoặc khẩu vị riêng.

cách làm kẹo mè đen

Dưới đây là những thành phần cần chuẩn bị để thực hiện cách làm kẹo mè đen chuẩn vị tại nhà:

  • 200g mè đen: Đã rang thơm, đây là nguyên liệu chủ đạo tạo nên hương vị đặc trưng cho món kẹo.

  • 60g hạt óc chó và hạt điều: Đã rang và cắt nhỏ. Hai loại hạt này không chỉ làm tăng độ giòn mà còn bổ sung nhiều dưỡng chất có lợi cho sức khỏe.

  • 150g kẹo mạch nha: Giúp tạo độ dẻo và kết dính các nguyên liệu lại với nhau một cách hoàn hảo.

  • 100g đường: Tạo vị ngọt đặc trưng và làm tăng độ thơm cho món kẹo.

  • 1/4 cốc nước lọc: Giúp hòa tan đường và làm dịu bớt độ đặc của mạch nha khi nấu.

  • 1 muỗng canh dầu ăn: Giúp chống dính khi đổ khuôn, đồng thời làm cho bề mặt kẹo bóng mượt hơn.

Với những nguyên liệu đơn giản nhưng được kết hợp một cách khéo léo này, bạn đã sẵn sàng bắt tay vào làm món kẹo mè đen giòn ngon, ngọt nhẹ và cực kỳ cuốn hút rồi đấy!

Dụng cụ cần chuẩn bị và hướng dẫn chi tiết cách làm kẹo mè đen thơm ngon tại nhà

Để tạo ra những miếng kẹo mè đen giòn tan, ngọt bùi chuẩn vị truyền thống, không chỉ cần nguyên liệu chất lượng mà các dụng cụ làm bếp phù hợp cũng đóng vai trò quan trọng. Việc chuẩn bị đầy đủ dụng cụ từ đầu sẽ giúp bạn tiết kiệm thời gian và dễ dàng hơn trong từng công đoạn chế biến.

Các dụng cụ cần thiết bao gồm:

  • Chảo chống dính sâu lòng: Đây là dụng cụ quan trọng giúp bạn nấu đường và mạch nha một cách đều tay mà không bị cháy khét.

  • Giấy nến hoặc giấy chống dính chuyên dụng: Dùng để lót dưới kẹo khi tạo hình, giúp chống dính và dễ dàng gỡ kẹo sau khi nguội.

  • Cây cán bột: Giúp dàn phẳng hỗn hợp kẹo một cách đều tay, tạo thành những lớp kẹo mỏng vừa ăn.

  • Dao sắc hoặc kéo cắt kẹo: Để cắt kẹo thành từng miếng nhỏ sau khi nguội.

  • Thớt hoặc khay sạch: Dùng làm bề mặt phẳng để cán và cắt kẹo.

cách làm kẹo mè đen

Chi tiết các bước trong cách làm kẹo mè đen tại nhà:

Bước 1 – Sơ chế các loại hạt:
Cho hạt óc chó và hạt điều vào chảo rang trên lửa nhỏ. Đảo đều tay cho đến khi hạt dậy mùi thơm, vỏ ngoài chuyển sang màu vàng nhẹ là được. Để nguội rồi bóc sạch vỏ lụa nếu có, sau đó băm nhỏ để dễ trộn vào hỗn hợp kẹo.

Bước 2 – Nấu hỗn hợp đường:
Cho đường, mạch nha và 1/4 cốc nước vào chảo chống dính. Đun trên lửa nhỏ, khuấy đều cho đến khi đường tan hoàn toàn và hỗn hợp chuyển sang màu cánh gián, có độ sánh nhẹ – đây là dấu hiệu cho thấy hỗn hợp đạt chuẩn caramel.

Bước 3 – Trộn nguyên liệu:
Khi nước đường đã đạt độ sánh mong muốn, cho ngay hạt mè đen rang, hạt óc chó và hạt điều đã băm nhỏ vào chảo. Dùng đũa hoặc muỗng gỗ khuấy nhanh tay để tất cả nguyên liệu được phủ đều lớp caramel ngọt thơm.

Bước 4 – Tạo hình kẹo:
Đổ hỗn hợp kẹo nóng lên giấy chống dính đã trải sẵn trên thớt hoặc mặt phẳng sạch. Dùng cây cán bột nhẹ nhàng dàn phẳng kẹo thành lớp đều, mỏng vừa phải tùy sở thích.

Bước 5 – Cắt và hoàn thiện:
Chờ cho kẹo nguội hoàn toàn rồi dùng dao sắc cắt thành từng miếng vuông nhỏ vừa ăn. Bảo quản trong lọ thủy tinh hoặc hộp kín để giữ độ giòn và thơm của kẹo.

Xem thêm: Bí quyết làm kẹo dừa sáp dẻo thơm chuẩn vị truyền thống

Thành phẩm hoàn hảo và gợi ý trang trí kẹo mè đen thêm bắt mắt, tinh tế

Sau khi hoàn tất các công đoạn chế biến, thành phẩm kẹo mè đen không chỉ cần đạt được độ ngon mà còn phải hấp dẫn về mặt hình thức. Một mẻ kẹo thành công là khi từng miếng kẹo có hình dáng vuông vắn, đều đặn, lớp bề mặt khô ráo, bóng nhẹ và không bị dính tay. Khi thưởng thức, bạn sẽ cảm nhận được lớp kẹo giòn rụm, vị ngọt vừa phải hòa quyện cùng độ bùi béo của mè đen, điểm xuyết thêm vị giòn thơm, ngậy nhẹ từ hạt óc chó và hạt điều – tất cả tạo nên một hương vị hài hòa, cuốn hút đến khó cưỡng.

Kẹo không bị quá cứng hay quá dẻo, khi cắn vào có độ giòn tan vừa đủ, để lại dư vị thanh nhẹ, không gắt cổ – đó chính là đặc điểm của một mẻ kẹo mè đen đạt chuẩn.

Về cách trình bày, bạn hoàn toàn có thể sáng tạo để món kẹo trở nên đẹp mắt và ý nghĩa hơn. Một vài gợi ý đơn giản nhưng hiệu quả:

  • Bọc từng viên kẹo trong giấy kiếng màu hoặc giấy gói thực phẩm chuyên dụng để tăng thêm sự bắt mắt và vệ sinh khi bảo quản.

  • Sắp xếp kẹo vào lọ thủy tinh hoặc hộp thiếc có lót giấy nến, trang trí thêm ruy băng hoặc nhãn dán xinh xắn – đây là lựa chọn lý tưởng để làm quà biếu trong dịp lễ Tết.

  • Nếu dùng trong gia đình, bạn có thể xếp kẹo lên đĩa gốm truyền thống, đặt giữa bàn trà để mời khách – vừa mộc mạc, gần gũi, vừa mang đậm nét văn hóa ẩm thực ngày Tết.

Tự tay thực hiện cách làm kẹo mè đen và trang trí chúng một cách tinh tế không chỉ thể hiện sự khéo léo mà còn là món quà ngọt ngào chứa đựng tâm ý chân thành dành tặng cho người thân, bạn bè trong những ngày đầu năm mới.

Thưởng thức kẹo mè đen đúng cách

Không chỉ là một món kẹo dân dã, kẹo mè đen còn mang trong mình sự tinh tế của nghệ thuật ẩm thực truyền thống. Khi cắn nhẹ một miếng kẹo, bạn sẽ cảm nhận ngay vị giòn tan nơi đầu lưỡi, theo sau là hương mè đen rang thơm lừng hòa quyện cùng độ béo ngậy của hạt điều, óc chó và vị ngọt dịu từ mạch nha. Từng lớp hương vị đan xen, nâng đỡ nhau một cách hài hòa, tạo nên một trải nghiệm khó quên cho vị giác.

Điều đặc biệt ở món kẹo này là dù ngọt nhưng không gắt, béo nhưng không ngấy – rất dễ ăn và phù hợp với nhiều lứa tuổi. Nhờ cách làm đơn giản, lại không sử dụng chất bảo quản, kẹo mè đen tự làm tại nhà không chỉ an toàn mà còn đảm bảo dinh dưỡng, là lựa chọn lý tưởng để chiêu đãi cả gia đình trong dịp Tết hoặc dùng làm món quà biếu đầy ý nghĩa.

cách làm kẹo mè đen

Để nâng tầm hương vị, đừng quên thưởng thức kẹo mè đen cùng một tách trà nóng – trà xanh, trà oolong hay trà thảo mộc đều rất hợp. Vị chan chát, thanh thanh của trà sẽ cân bằng độ ngọt của kẹo, giúp bạn cảm nhận trọn vẹn hơn sự tinh túy ẩn chứa trong từng nguyên liệu. Đây cũng là cách thưởng thức truyền thống, mang lại cảm giác ấm cúng, thư thái – rất phù hợp cho những buổi sum họp đầu xuân.

Không cần cầu kỳ, đôi khi chỉ với một dĩa kẹo mè đen và ấm trà nóng, bạn đã có thể tạo nên một không gian ngọt ngào, bình yên – nơi gắn kết yêu thương và lưu giữ hương vị Tết đậm đà theo năm tháng.

Bí quyết nhỏ giúp món kẹo mè đen đạt chuẩn 

Để làm ra những mẻ kẹo mè đen thật sự thơm ngon, giòn bùi đúng điệu, bạn không chỉ cần làm đúng công thức mà còn nên lưu ý một vài mẹo nhỏ sau đây – những chi tiết tưởng chừng đơn giản nhưng lại quyết định rất nhiều đến hương vị và hình thức của thành phẩm cuối cùng.

Trước hết, nếu muốn món kẹo thêm phần hấp dẫn và mùi thơm đặc trưng hơn, bạn có thể linh hoạt thay đổi tỷ lệ mè: thay vì dùng hoàn toàn mè đen, hãy thử phối hợp 150g mè đen với 50g mè trắng. Sự hòa quyện giữa hai loại mè sẽ tạo nên hương vị độc đáo hơn, đồng thời giúp màu sắc kẹo trở nên sinh động và bắt mắt hơn khi cắt thành miếng.

Trong quá trình nấu nước đường với mạch nha, bạn cần đặc biệt chú ý đến độ sánh và màu sắc. Khi hỗn hợp bắt đầu ngả màu cánh gián và sánh đặc lại, đó là thời điểm lý tưởng để cho mè và các loại hạt vào. Một mẹo nhỏ để kiểm tra độ đạt: hãy múc một ít nước đường và thả vào bát nước lạnh – nếu đường nhanh chóng đông lại, giòn cứng và không dính tay thì tức là bạn đã thắng đường thành công.

Khi cho mè và hạt vào, hãy đảo thật nhanh và đều tay để hỗn hợp quyện kỹ, tránh tình trạng kẹo bị vón cục hoặc không đều nguyên liệu. Ngoài ra, quá trình cán kẹo và tạo hình cũng cần thực hiện khi hỗn hợp còn nóng – lúc này kẹo còn dẻo và dễ tạo hình. Cuối cùng, để có được những miếng kẹo vuông vắn và đẹp mắt, bạn nên dùng dao thật bén và cắt ngay khi kẹo vừa nguội.

Với vị ngọt thanh, giòn tan và thơm bùi đặc trưng từ mè rang cùng các loại hạt dinh dưỡng, món kẹo mè đen tự làm tại nhà chắc chắn sẽ trở thành điểm nhấn thú vị cho khay bánh mứt ngày Tết. Không chỉ là món ăn vặt hấp dẫn, kẹo mè đen còn là biểu tượng của sự khéo léo, tỉ mỉ và ấm áp tình thân – một món quà ngọt ngào dành cho những phút sum vầy đầu năm.

🎁 Bạn đang tìm một món quà Tết vừa ngon miệng, vừa tốt cho sức khỏe lại mang đậm hương vị truyền thống? Đừng bỏ qua món kẹo mè đen – đặc sản thơm bùi đang “gây thương nhớ” tại Khô Bò CALI!

💝 Với công thức đặc biệt kết hợp mè đen nguyên chất, mạch nha truyền thống, hạt điều và óc chó rang thơm giòn – từng miếng kẹo mè đen Khô Bò CALI là một bản hòa ca ngọt ngào giữa vị béo, giòn và ngọt thanh tự nhiên. Không sử dụng chất bảo quản, không hương liệu công nghiệp – đây là món kẹo thuần túy, an toàn và cực kỳ bổ dưỡng cho mọi thành viên trong gia đình.

🌟 Vì sao nên chọn kẹo mè đen Khô Bò CALI?

  • Nguyên liệu cao cấp, tuyển chọn kỹ lưỡng

  • Làm thủ công mỗi ngày, cam kết tươi mới

  • Bao bì sang trọng, thích hợp làm quà biếu

  • Vị ngọt dịu nhẹ – giòn, bùi, không ngán

  • Tốt cho tim mạch, tiêu hóa, giúp ngủ ngon

👉 Đặt ngay hôm nay để có những hộp kẹo mè đen thơm ngon chuẩn vị – góp phần làm tròn đầy khay bánh mứt ngày Tết, hoặc gửi trao yêu thương đến người thân yêu.

📦 Số lượng có hạn – nhận đơn sớm để được giá ưu đãi & freeship toàn quốc!

📞 Gọi ngay: +1 (714) 452-7679 / +1 (714) 234-6899
💬 Inbox fanpage Khô Bò CALI để được tư vấn nhanh nhất!